All You Need to Know About Automatic Transfer Switch For Whole-Home Backup In The US
- What Problems Does an Automatic Transfer Switch Solve at Home?
- Which Automatic Transfer Switches Fit Typical US Services?
- How to Plan Wiring for an Inverter Automatic Transfer Switch
- Where Should a Solar Automatic Transfer Switch Sit in PV + Battery Systems?
- When Do You Need an Automatic Transfer Switch for Generator Support?
- How to Choose an Automatic Generator Transfer Switch or Backup Switch
- Can You Commission, Test, and Prove the ATS Before the Next Outage?
- Automatic Transfer Switch and Whole Home Backup
- 5 FAQs about Automatic Transfer Switches
Planning a whole-home backup is a build decision. You want an automatic transfer switch that moves loads fast, keeps crews safe, and passes inspection. This guide focuses on large US homes that use solar, an inverter, and a battery system. You will see how to select the device, where to place it, and how to test it so outages feel routine.
What Problems Does an Automatic Transfer Switch Solve at Home?
An automatic transfer switch keeps the house running when the grid fails. It senses the outage and shifts to backup power with no manual steps. It prevents backfeed to utility lines and coordinates the main service, the inverter, and your loads. With automatic transfer switches in place, HVAC, refrigeration, medical devices, and network gear can stay online while line workers remain protected.
Which Automatic Transfer Switches Fit Typical US Services?
Most US homes use 200A split-phase service at 120 and 240 volts. In that setting, an automatic transfer switch usually sits in one of two locations. A meter collar automatic transfer switch goes between the utility meter and the main panel for whole-home backup with minimal breaker moves. A panel-mounted transfer switch or a critical-loads subpanel serves selected circuits when full-home backup is not required.
Quick comparison
Decision Checkpoint | Meter Collar Automatic Transfer Switch | Subpanel / Transfer Switch |
200A Whole Home | Keeps the main panel intact | Requires moving priority circuits |
Conduit Distance | Short run near meter and main | More branch rewiring inside |
Inspection Path | Often includes meter-side review | Standard rough-in review |
Future Expansion | Leaves panel spaces free | Limited by subpanel capacity |
Rule of thumb: if you want 200A whole-home backup with the least panel reshuffle, start with a meter collar automatic transfer switch path.
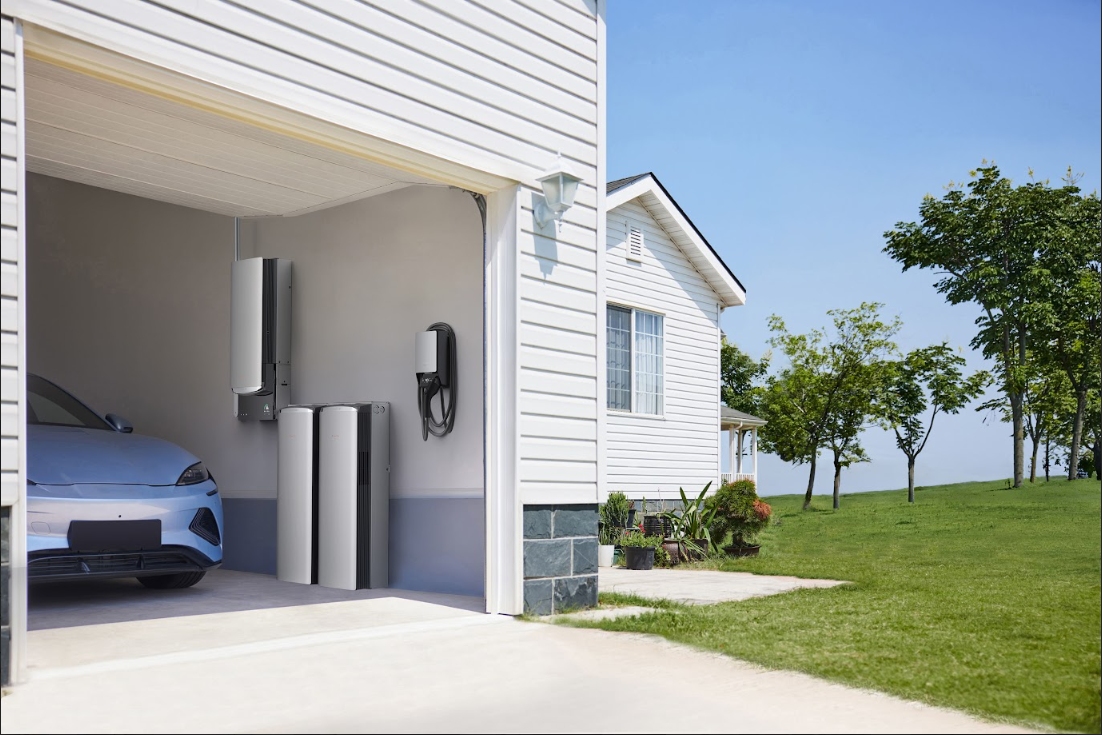
For projects that target high headroom on a 200A service, pair a high-capacity inverter with a meter collar automatic transfer switch that integrates with your app. EcoFlow OCEAN Pro with the EcoFlow OCEAN Meter Backup Switch is an example of this route. The system delivers 24 kW continuous output, accepts up to 40 kW of solar input, scales storage to 80 kWh, and the meter-side backup switch supports 200A, ≤ 15 ms transfer, NEMA 3R outdoor placement, energy monitoring, and documentation that aligns with permitting and inspection.
How to Plan Wiring for an Inverter Automatic Transfer Switch
This step sets the tone for the whole build. Start at the service entrance and map the path from the meter to the main breaker, then to the inverter automatic transfer switch and the battery stack. Keep running short and well supported. Confirm neutral and ground handling at every junction. Respect working clearances so that installers and inspectors can reach equipment easily.
A practical planning sequence helps everyone stay aligned:
- Confirm meter location and bonding, then mark a mounting spot with weather protection outdoors and ventilation indoors.
- Place CT sensors where the app can read true whole-home flow, then verify direction with a live reading.
- Keep communication lines away from high-current AC conductors to reduce noise.
- Label all disconnects and breakers clearly, so inspection progresses without delays.
Plan the paperwork at the same time. Coordinate with the utility, submit permit drawings, complete rough-in, schedule inspection, commission the system, and run a documented outage drill. With a well-planned inverter automatic transfer switch, large motor loads such as central air, a pool pump, and an EV charger can remain available within the power budget that you and your installer define.
Where Should a Solar Automatic Transfer Switch Sit in PV + Battery Systems?
Location drives reliability. A solar automatic transfer switch needs a position that sees the grid status and the backup bus. Ideally, place it near the main service panel or meter so it can monitor both the grid and backup circuits effectively. In AC-coupled designs, it supervises the handoff between the utility and the inverter’s backup circuits. In DC-coupled designs, the inverter manages PV and battery internally, while the automatic transfer switch focuses on grid presence and safe isolation.
Mind the environment. Outdoor placements should meet NEMA 3R with drip protection and sealed penetrations. Indoor placements need airflow and clearances. Keep the backup switch accessible for service and leave space for future expansion, such as additional battery modules or a second inverter. Short, direct conduit runs help reduce voltage drop and simplify inspection.
When Do You Need an Automatic Transfer Switch for Generator Support?
Some regions face long storms or public safety shutoffs. In those cases, an automatic transfer switch for generator support adds stamina. Place the generator inlet near the service side to shorten cable runs and keep exhaust away from living spaces. Size the generator for typical outage loads and set state-of-charge rules in the app, so the call for the generator occurs only when needed.
An automatic generator transfer switch can start a generator when batteries fall to a set threshold and solar is limited by weather. The inverter stabilizes voltage and frequency while the generator serves loads and refuels storage. After recovery, control returns to the normal profile, so fuel use stays sensible.
How to Choose an Automatic Generator Transfer Switch or Backup Switch
Start with your goals. Decide on whole-home coverage or a critical-loads approach, confirm what your electrical service supports, and align budget and timeline. Turn these answers into a simple decision path before you look at specific models.
Quick Scenario Match
Scenario | Primary Path |
200A 120/240V split-phase and you want whole-home backup | Meter collar automatic transfer switch |
Older panel or limited rewiring space, critical circuits only | Panel-mounted transfer switch or critical-loads subpanel |
Long outages expected and a generator planned | Automatic generator transfer switch with start and retransfer control |
Future expansion for batteries or a second inverter | Meter collar form factor with good service access |
Selection Checkpoints
Service And Configuration. Confirm the main breaker rating and service type. Many large US homes use 200A 120/240V split-phase. Rely on the panel nameplate and utility guidance.
Transfer Performance And Control. Choose millisecond-class transfer. Fifteen milliseconds or less helps compressors and electronics stay stable. For generator use, select an automatic generator transfer switch with start contacts and configurable thresholds.
Compatibility And Certifications. Match requires listings and documents for your jurisdiction. Examples include UL 1008 for transfer switches and UL 1741 or UL 9540 on inverter and system files, as required by the local authority having jurisdiction and utility.
Enclosure And Placement. For outdoor installs, use NEMA 3R or higher. Maintain working clearances, short straight conduits, and proper sealing for inspection and future service.
Budget And Timeline
Panel-mounted solutions for partial homes are often equipment-efficient but may require moving circuits into a subpanel, which adds labor and testing time. Whole-home designs with a meter collar automatic transfer switch can reduce breaker reshuffling, while utility coordination becomes the key schedule driver. Final costs depend on labor, permits, conduit length, and utility steps. Use a local licensed electrician’s estimate.
Post-Install Validation
After installation, run a controlled outage test. Record transfer time, verify that priority circuits stay powered, and check 120 and 240 volt balance. Confirm clean retransfer when utility service returns. If a generator is included, set state of charge thresholds and quiet hours in the app, test cold and warm starts, and save time-stamped records.
Can You Commission, Test, and Prove the ATS Before the Next Outage?
Yes. Treat this as part of commissioning and record it. After rough-in and inspection, run a full outage drill. Cut the grid power at the proper disconnect and watch the automatic transfer switch and inverter sequence. Check transfer time, status lights, and app telemetry. Verify that 120 and 240-volt circuits remain balanced. Confirm a clean retransfer when grid power returns. Save photos and app screenshots with timestamps, voltages, and currents. That record becomes your baseline for support and future changes.
Homes with solar should test on a sunny day and on a cloudy day. The first confirms PV-to-load behavior. The second validates charging rules and runtime when PV is weak. If you added generator support, test warm starts and cold starts. Confirm that the automatic generator transfer switch releases the generator after the batteries recover.
Automatic Transfer Switch and Whole Home Backup
A strong plan begins with the right automatic transfer switch, a clear wiring path, and clean documentation. Place the device where it can see the grid and protect crews during service. Document the path from meter to main panel, then to the inverter and batteries, and leave space for growth. Commission with intention and keep a record of results. Follow these steps, and an outage becomes a short event instead of a long disruption.
5 FAQs about Automatic Transfer Switches
Q1. Do I need utility approval before installing an automatic transfer switch?
A: Yes. Call your utility in advance and request their approved list of meter collars, clearance procedures, and cutover procedures. Provide them with a copy of your single-line diagram and permit package. Schedule a meter pull or a tag-out in advance. Collaboration in advance shortens the installation outage day and minimizes unnecessary work during inspection.
Q2. Will an automatic transfer switch impact my time-of-use plan and/or my smart meter?
A: A utility-authorized meter-collar auto transfer switch typically maintains metering and time-of-use billing. Leave the required working space free. Inspect the routing of the wires and seal around the socket. Your installer has to record serial numbers and photographs for utility records so billing, demand management, and remote reading continue to function well when there is a changeover.
Q3. How do you maintain and inspect an ATS once installed?
A: Keep it simple. Look for moisture, insects, and loose tags monthly. Experiment with the switch three times annually by turning the power off at the circuit breaker or fuse panel and observing the result. Have the tightness and connections inspected by a licensed electrician at least once a year, clean contact points as necessary, and update the inverter and monitoring system software.
Q4. What's a good power-cut plan for large houses in a blackout?
A: Prioritize items. Place medical equipment, refrigeration, and essential lighting in Level 1. Place HVAC with soft start in Level 2 and EV charging in Level 3. Obey inverter guidelines regarding charge levels and quiet hours. This plan is more durable and maintains comfort consistently without needing to switch breakers during storms.
Q5. Can I install a whole-house surge protector if an ATS is already installed?
A: Yes. Install a Type 1 or Type 2 surge protective device at the main service equipment. Install another SPD as close as possible to the inverter if permitted by the code. Install short, straight cables and make good connections to minimize let-through energy. Coordinated surge protection prevents electronics from being damaged and allows the automatic transfer switch to function properly after outages.
For press requests or interview opportunities, reach out to our media team
media.na@ecoflow.com