The Ultimate DIY Guide to Spooky Halloween Window Projections
Turning your windows into spine-chilling displays doesn't require a Hollywood budget or tech wizardry. Halloween window projections let you create jaw-dropping effects that'll have your neighbors stopping in their tracks. This guide breaks down everything you need to know to pull off professional-looking spooky displays right from your living room.
What Are Halloween Window Projections and Why Try Them?
Halloween window projections are precisely what they sound like-you're using a projector to project creepy images or videos into your windows from inside your home. Imagine ghosts floating across your windows, zombies breaking in, and witches laughing as trick-or-treaters walk by.
Basic Concept and How It Works
The system is quite simple. You install a projector in your home and aim it at a window. Between the window and the projector, you set up a partially opaque screen. As your projector displays your choice of Halloween window decoration pictures, others view your images on your window, while you remain safe and sound on the other side. The screen is like a movie theater screen, though instead of watching from the front, they watch from the other side.
Visual Impact and Appeal
The beauty of it is that your Halloween window displays become the buzz in the neighborhood without cluttering your yard with inflatables or spending time unrolling light strings. You can do with one projector what would run into hundreds in other decorations that signify Halloween, which you can then reuse for different displays from year to year.
What Equipment Do You Need for Halloween Window Projection?
Getting started doesn't have to mean breaking the bank, but understanding what really matters helps make wise spending choices. Let's talk about the equipment necessary for your scary Halloween window projections.
Projector Requirements And Specifications
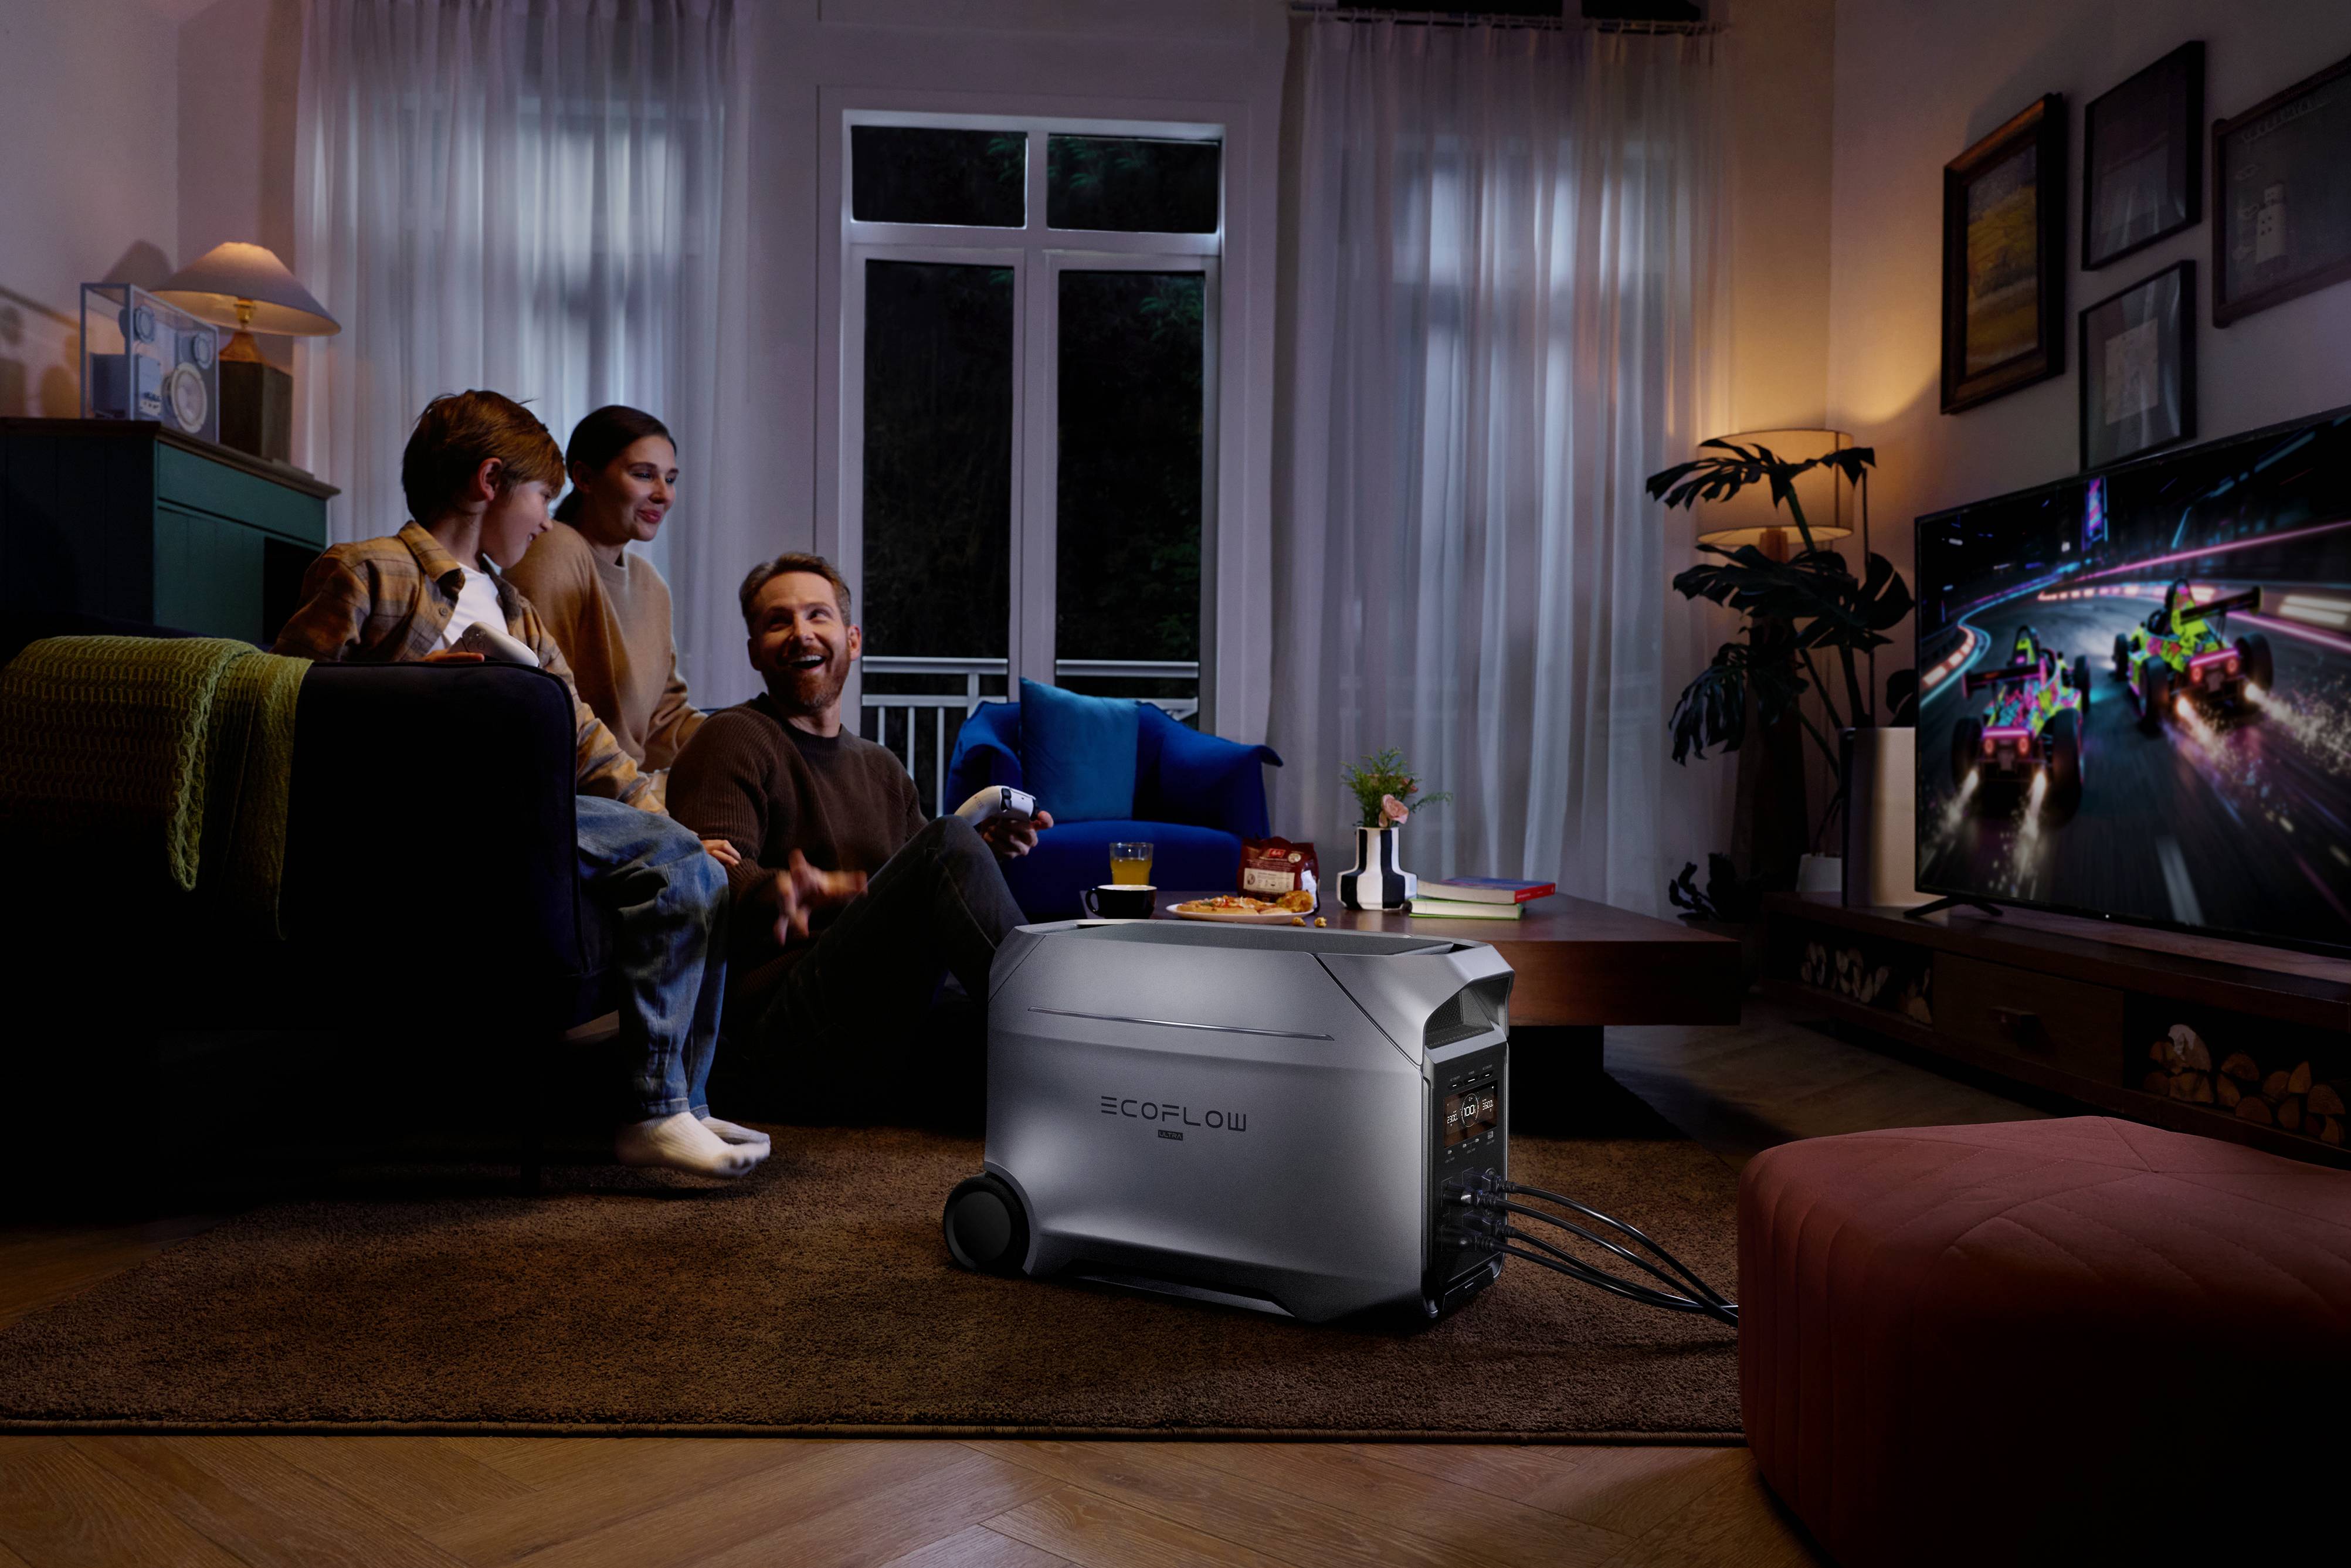
For outdoor viewing through windows, you need about 1,500–2,000 ANSI lumens for dark rooms, and 3,000+ ANSI lumens if there’s noticeable ambient light. Anything less and your image washes out, especially if there's any ambient light around. A basic LCD or DLP projector works fine—you don't need fancy 4K resolution since people will be viewing from a distance. A 1080p resolution is plenty, though even 720p can work if your budget is tight. Look for projectors with HDMI inputs so you can easily connect laptops, tablets, or media players. Some projectors even have built-in speakers, so you don't need to buy separate audio equipment. Specific prices vary widely by brand and brightness, so compare features rather than relying on a single “budget” number. If you plan to loop all evening or drive a brighter 3000+ lumen projector plus external speakers, consider a portable power station as an “independent power source”: for example, EcoFlow DELTA 3 Classic (about 1024Wh capacity, 1800W AC output) easily handles projector + player loads; for more headroom, step up to DELTA 3 Max (2048Wh, 2400W AC) or DELTA 3 Max Plus (2048Wh, 3000W AC).
Screen Materials and Alternatives
Professional projection screens work great, but aren't necessary. A white bed sheet creates surprisingly good results for Halloween window decorations. The key is finding material that's thin enough to let light through but thick enough to display a clear image. Shower curtain liners (the white, semi-translucent kind) work amazingly well and cost a few dollars. Some folks use special holographic projection film or rear-projection screen material to achieve the sharpest images. Retail listings show rear-projection sheets around ~$40 for small sizes, with larger panels costing more. Whatever you choose, make sure it's wrinkle-free on that sheet before hanging it up.
Audio Equipment Options
Built-in projector speakers are usually weak and sound weak, creating an oper spooky atmosphere. Grab a Bluetooth speaker ($30-50) or connect to a sound system if you have one. Place speakers near your window so the sound appears to come from the projection. This sync between visual and audio really sells the effect. Want your speakers and audio interface near the window without running long cables? Use DELTA 3 Classic for local power; if you’ll also run a low-power fogger or multiple light channels, DELTA 3 Max Plus with its higher 3000W AC output and richer DC/USB-C (including 140W) ports can power the full audio–lighting rig at once.
Power Supply and Cable Setup
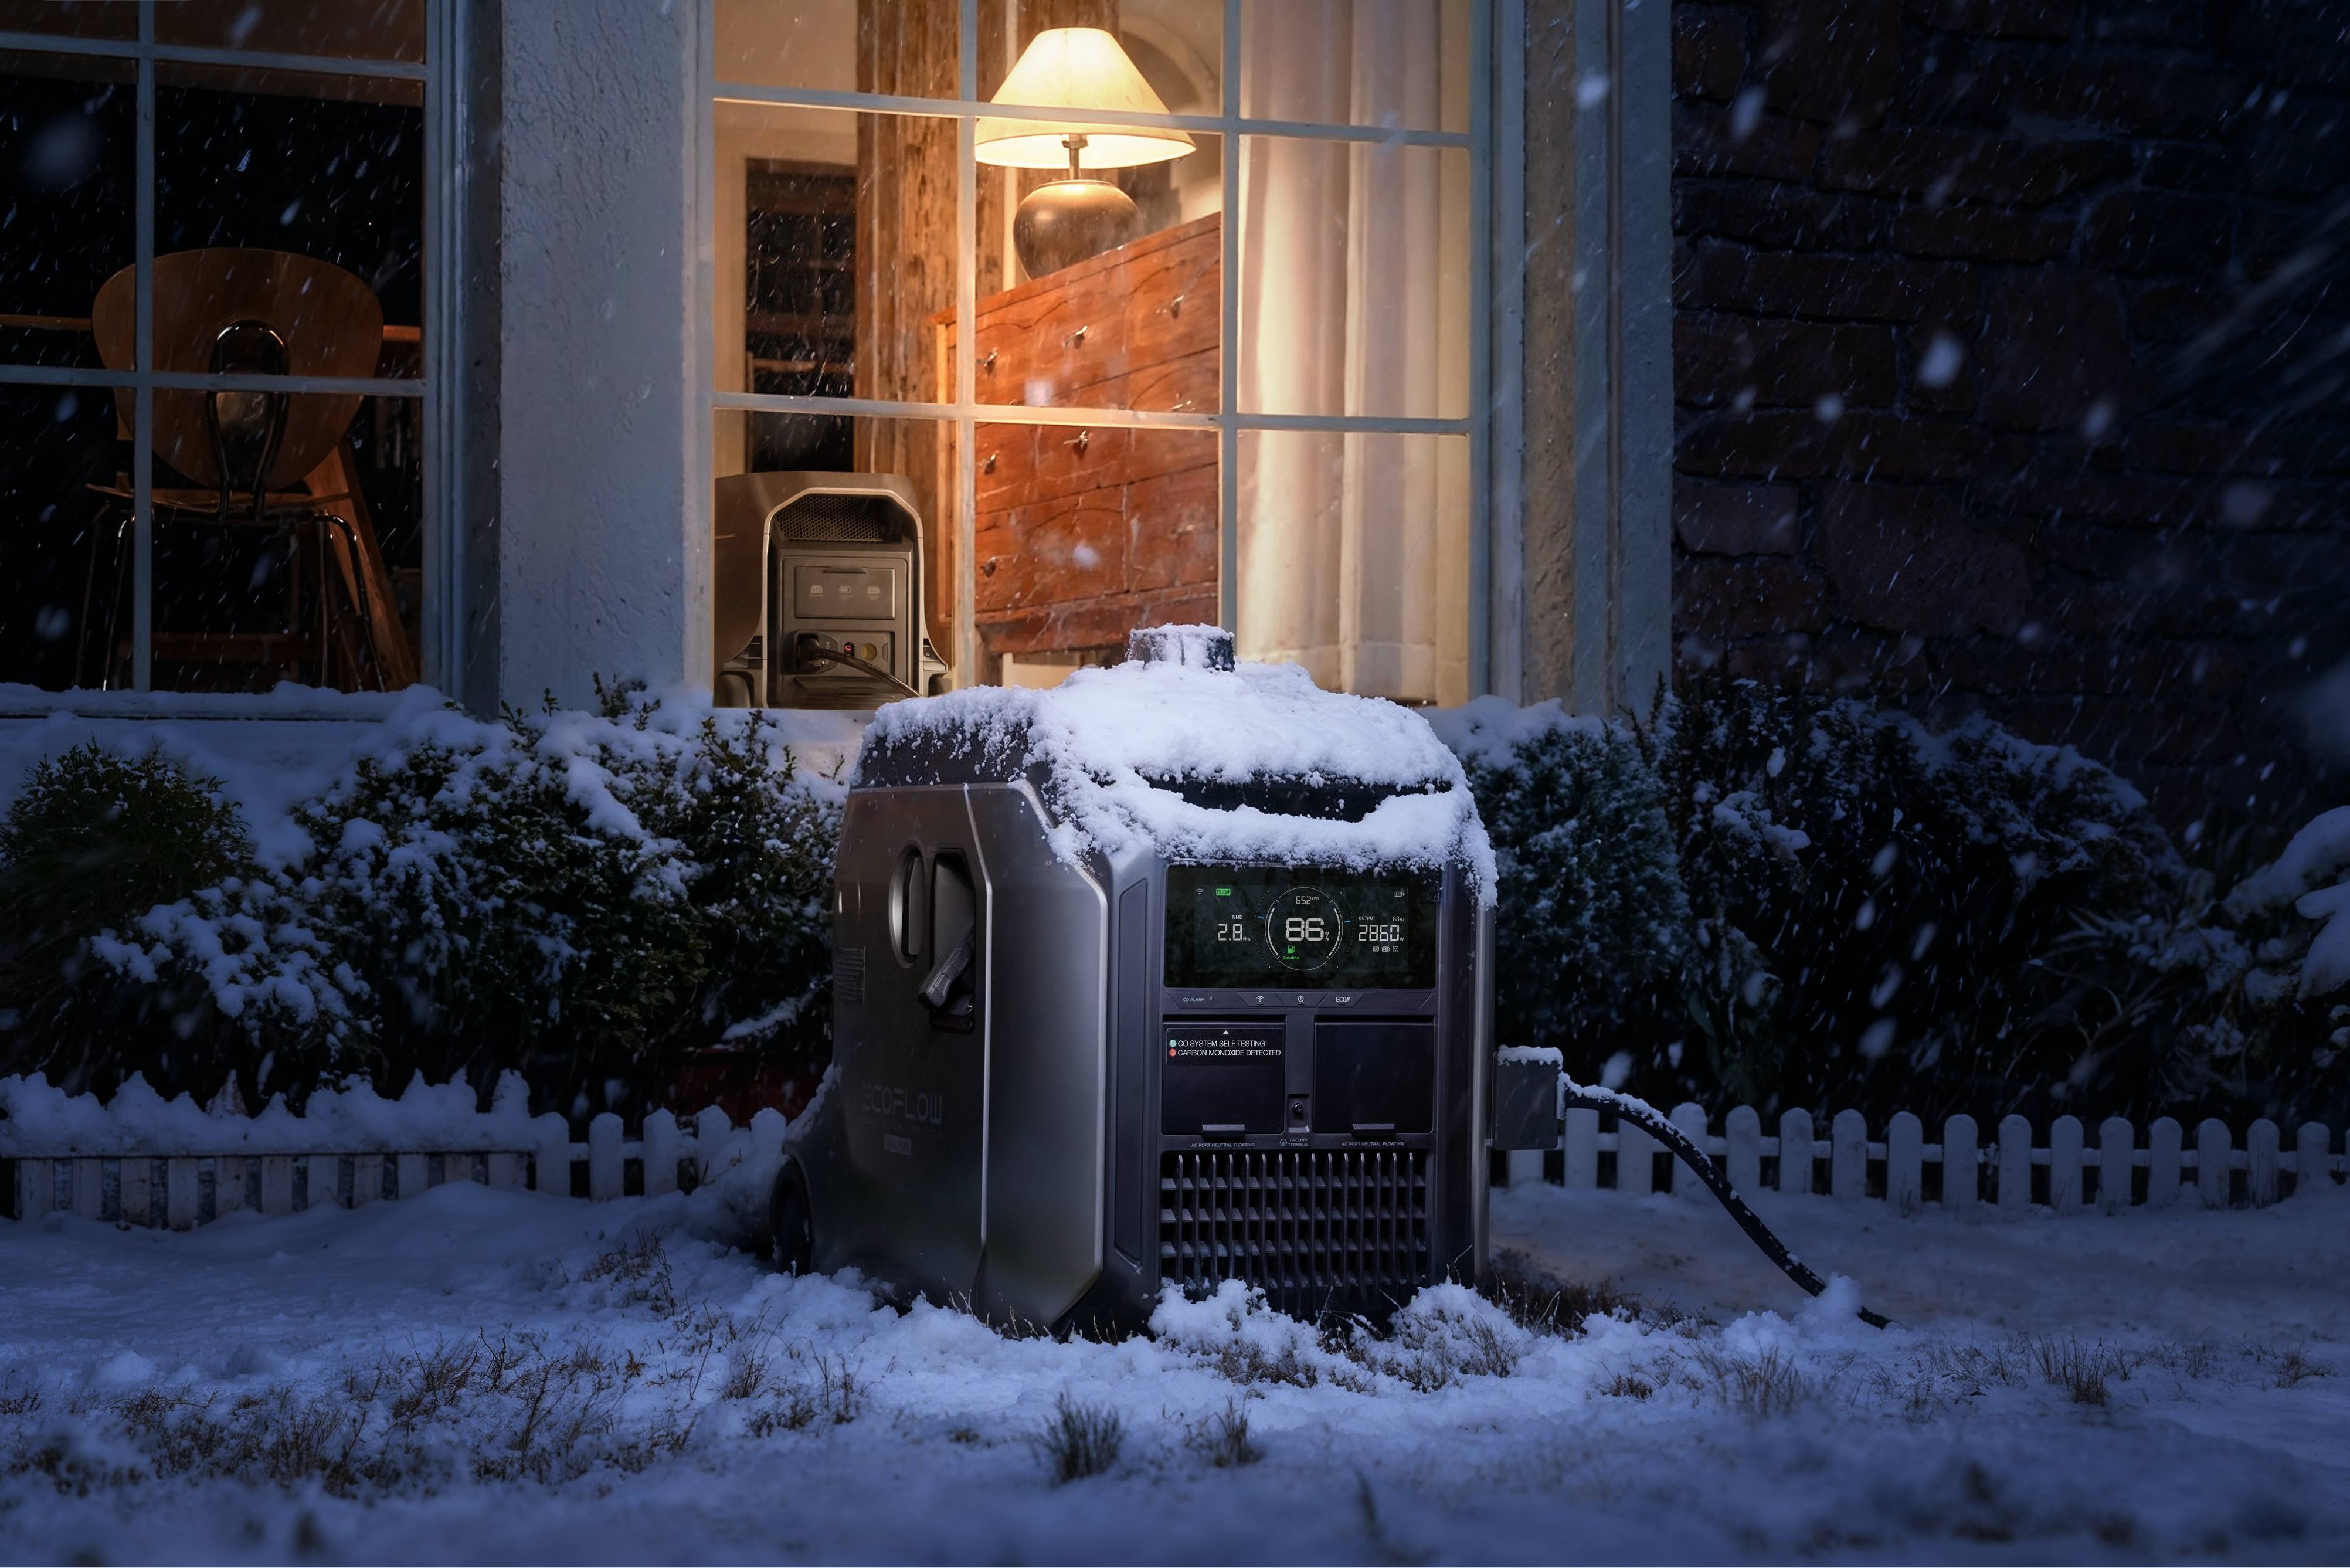
Typical projectors range from about 50 watts (portables) to a few hundred watts (domestic/bright projectors), with many mid-priced units in the 150-300 watt range. They'll be just fine on any standard power outlet, though you'll probably need to run extension cords from the outlets to where your projector is located. Buy high-powered cords for these applications rather than connecting multiple low-end extension cords. Outdoor sound systems or lighting effects could use a surge-protected power strip located well out of harm's way. Don’t want a tangle of long cords? Move the power to the gear: DELTA 3 Classic runs quietly at moderate loads (≤ about 30dB at partial load), ideal for late-night Halloween ambience; if you’re adding porch/yard floodlights and a brighter projector, DELTA 3 Ultra Plus (3072Wh, 3600W AC) can drive projector + speakers + lighting together, reducing the risk of trips or voltage drop during peak draw.
Mounting Hardware and Stands
A basic projector tripod costs $25-40 and offers flexible positioning. Camera tripods work in a pinch. Some people stack books or boxes to get the right height, though that's less stable. If you're mounting near a window for multiple nights, adhesive hooks and zip ties can secure cables and keep everything tidy.
How Do You Choose the Right Content for Spooky Halloween Window Projections?
Content makes or breaks your display. Great equipment with boring videos falls flat, while decent gear with compelling content creates memorable Halloween window decorations.
Pre-Made Halloween Projection Videos
YouTube offers hundreds of free Halloween window projection videos specifically designed for this purpose. Search for "Halloween window projection loops" and you'll find everything from attacking zombies to creepy silhouettes.
Static Image Projections
Don't overlook the power of simple, creepy still images. A cracked window effect, bloody handprints, or A shadowy figure can be just as effective as full animations, especially if you're projecting on multiple windows. Static images use way less computer processing power and never have loop points that break the illusion.
Duration and Loop Settings
Shorter loops (2-3 minutes) work better than you'd think. Viewers typically only watch for 30-60 seconds before moving on. Where loop length matters is if you're home watching—you'll notice a 30-second loop repeating, but trick-or-treaters won't. Set your media player to loop continuously and test it beforehand to ensure smooth transitions without black screens between loops.
Age-Appropriate Content Selection
Match your content to your neighborhood. If you have lots of young kids, stick with friendly ghosts and silly monsters. Save the gore and jump scares for areas with mostly teens and adults. You can always start mild in the early evening and switch to scarier content after 8 PM, when little ones are in bed.
How to Set Up Your Halloween Window Projection System?
Installation might sound complicated, but breaking it down into steps makes it simple. Plan for about an hour to get everything dialed in the first time.
Window Prep and Cleaning
Clean your windows inside and out—smudges and dirt scatter light and muddy your image. Remove any existing window decorations, blinds, or curtains. You want a clear path from the projector to the window with nothing blocking the light.
Space Measurement and Planning
Measure the distance from where your projector will sit to your window. Typical setups need roughly 8–12 feet to fill an 80–100 inch “window-sized” image, but check your projector’s throw ratio. Check your projector's specifications online—they'll tell you exactly how far back you need to be for your desired image size. Mark this spot with tape so you can position the projector correctly.
Optimal Projector Placement
Set your projector on a tripod or stable surface at roughly the same height as the center of your window. Point it straight at the window, not at an angle (angling creates a distorted, keystone-shaped image). The projector should be level—use a bubble level app on your phone if you don't have a real one.
Screen Installation Steps
Hang your screen material taut across the inside of your window frame. Tension is crucial—wrinkles show up as weird lines in your projection. Use painter's tape around the edges to hold sheet material, or install small hooks for a more permanent setup. The screen should sit close to the glass, maybe an inch or two away.
Distance and Angle Calculations
Turn on your projector and display a test image (a plain white screen works). Adjust the distance until the projected image fills your window without spilling over the edges. Use the projector's zoom function for fine-tuning. Most projectors have a focus ring—adjust this until the image looks sharp from both inside and outside the window.
Cable Management and Organization
Tape down all cables running across floors to prevent tripping hazards. Keep power strips away from windows where they might get wet if it rains. If running cables under doors, use foam cord protectors so the door still closes properly. Label your cables so setup is easier next year. If you place a portable power station by the window or under the projector tripod, cable runs are shorter and safer: DELTA 3 Max and DELTA 3 Ultra Plus both offer multiple AC outlets and DC/USB ports, so you can plug in projector, player, Bluetooth speaker, and ambient lights in one spot—no “spider web” wiring; meanwhile, DELTA 3 Classic offers ~10ms auto-switching to ride through brief outages so your loops don’t cut out (device-dependent).
Image Testing and Optimization
Go outside and check how your Halloween window decorations look from the street. Adjust brightness if needed (most projectors have an eco/bright mode—use bright mode). Tweak the projector position if the image isn't centered. This outside check is essential—what looks good inside might not translate well from viewing distance.
Audio Synchronization
Start your video and audio at the same time. If using separate speakers, you might need to add a slight delay in your media player settings if the sound arrives before the video action. Test this by watching closely—if a ghost's mouth moves before you hear the scream, adjust the timing.
Safety Considerations (Power, Weather, Fire)
Never run extension cords through puddles or rain. Keep your projector and electronics well inside, away from open windows. If using fog machines or additional effects, ensure they're rated for indoor use and you've got proper ventilation. Don't block smoke detectors or emergency exits with your setup. Unplug everything when you're not home—projector bulbs get hot, and you don't want any fire risks. If you’re adding foggers/floodlights and other heavy loads in the yard or on the porch, power them from a portable power station placed close to the devices: DELTA 3 Ultra Plus (3072Wh, 3600W AC, expandable) is better suited for all-night runtime with multiple devices in parallel—and it won’t spoil the vibe with noise.
FAQ
Q1. Can I Use My Halloween Window Projection Setup If My Windows Face Direct Streetlights?
Ambient light is the nemesis of projections. Also, if street lamps project light directly onto your window where you project images, either get a much brighter projector with 3,000+ ANSI lumens or temporarily reduce the external light by installing curtains around, but not on top of, your projected display area. Some projectors cleverly project from a window on the side where it is less bright, while others make their own light shields using black poster board with a screen cutout to encircle the projected area to reduce spilling light. Showing the display in the evening is also an excellent way to counter high levels of light in the surroundings.
Q2. What’s the Difference Between Front Projection and Rear Projection for Halloween Window Decorations?
Rear projection (what we'll be talking about in this article) is from inside your house, projecting outward toward the viewers on the other side. Front projection is from outside, with the projector shining into your window from the other side. Rear projection is much more helpful for Halloween window projections because your equipment is protected from the elements, theft, and vandalism. Front projectors need to be weatherproof, and they cast shadows when someone walks in front of the projector, illuminating the window.
Q3. How Do I Prevent My Halloween Window Projections from Looking Washed Out?
Other than having a bright projector, the key is to regulate the light inside. Turn off all light sources in the room where the projector is located; even light behind the screen can sharply reduce the image. Also, close the door so light from other parts of the building doesn't enter. Blackout curtains on neighboring light sources in different rooms would also be helpful. At night, light in the sky is reduced, making your projections more visible. Also, if your projected image appears dim, your screen may be too thick; using thinner screen material will improve the lighting.
Conclusion
You’ve got everything you need to create stunning, spooky Halloween window projections that’ll make your house the highlight of the neighborhood. Start planning now—grab a projector, test some free videos, and do a practice run before Halloween night. Your windows are about to become the coolest Halloween window decorations on the block. Want to make your “Halloween projection” truly plug-and-play for outdoor use? Check out EcoFlow DELTA 3 series: DELTA 3 Classic (1024Wh/1800W, 0–80% ≈ 45 min), DELTA 3 Max/Max Plus (2048Wh, up to 3000W AC), and DELTA 3 Ultra/Ultra Plus (3072Wh/3600W AC, great for multi-device, all-night use). (See the official DELTA 3 Classic product page for detailed specs and buying options.)
For press requests or interview opportunities, reach out to our media team
media.na@ecoflow.com