Nature Photography Guide: Tips, Techniques & Essential Gear
- What is nature photography?
- Types of Nature Photography
- Planning Your Nature Photography Shoot
- Essential gear for nature photography
- Best camera settings for nature photography
- Lighting tips for stunning nature photos
- Common mistakes to avoid in nature photography
- Ethical rules for nature photography
- Conclusion
- FAQs
Capturing the beauty of nature requires more than just a camera—it calls for the right techniques, thoughtful composition, and reliable gear. From landscapes to wildlife, understanding how to work with light, environment, and subject placement can dramatically improve your photos.
Portable power stations are essential for nature photographers, especially when shooting in remote locations without access to electricity. They allow you to keep cameras, drones, and other devices charged, ensuring longer and uninterrupted photography sessions in the field.
What is nature photography?
Nature photography is all about taking pictures of the world outside. It focuses on things like tall mountains, green forests, and wild animals. Some photographers love to take wide shots of the ocean at sunset. On the other hand, others like to zoom in on tiny things, like a bee on a flower or a raindrop on a leaf. However, the end goal is to show the beauty of the Earth and help people see amazing places they might never visit in person.
Types of Nature Photography
Generally, there are many ways to take pictures of the outdoor space. You can look at big mountains and tiny bugs. Each style uses different tools to capture natural beauty. Most photographers pick one favorite style to practice. Here is a detailed overview of the different types of photography.
Landscape photography
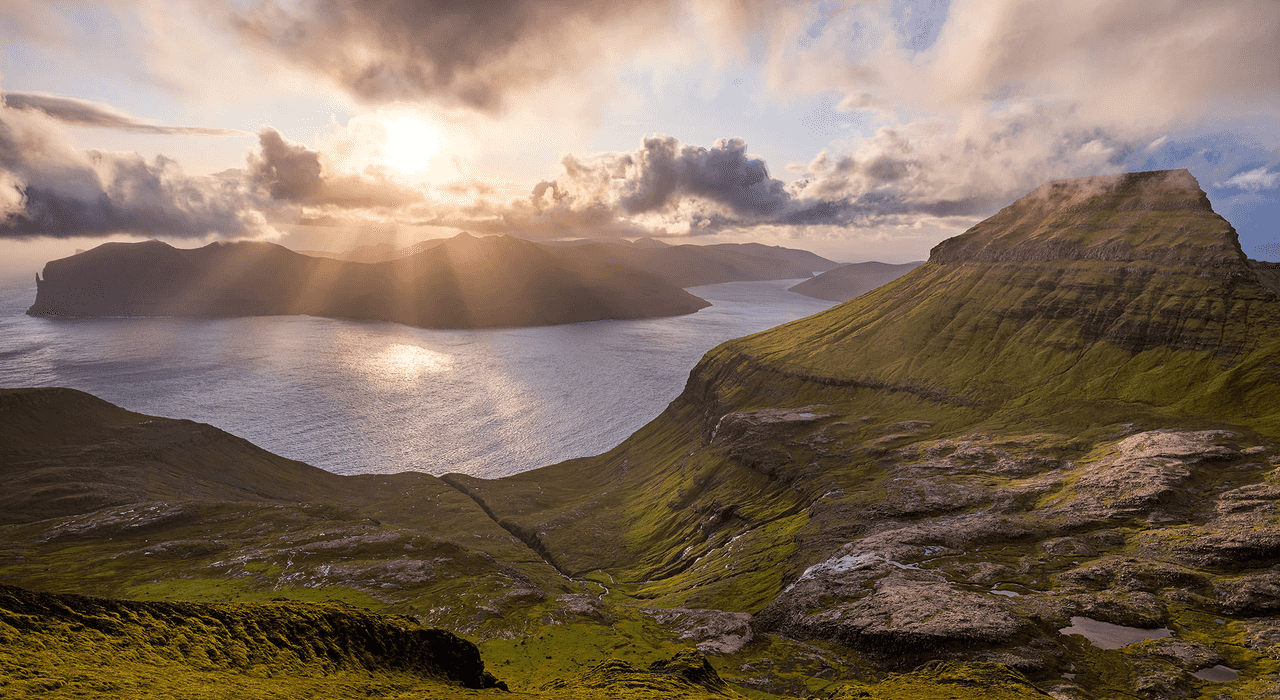
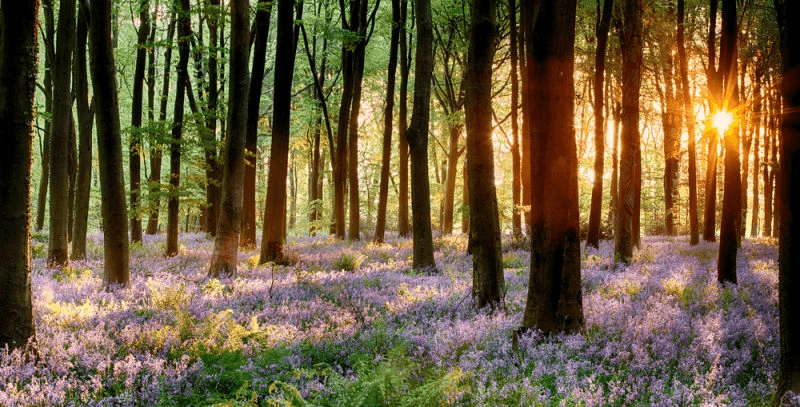
The nature landscape photography is about big views. Photographers take pictures of wide spaces like deserts, forests, or oceans. They often use wide lenses to fit everything in. Furthermore, people take these shots during sunrise or sunset. The landscape nature photography makes the world look very calm and bright.
Wildlife photography
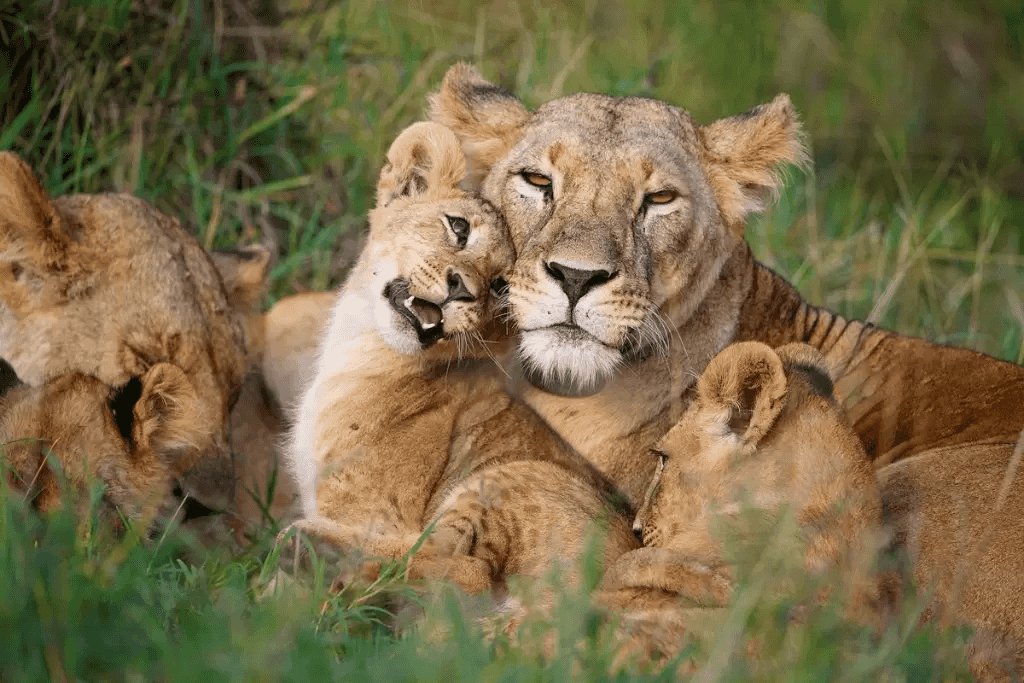
Well, this type focuses on animals in their homes. You have to be very patient and stay quiet. Usually, the photographers use long lenses. So, they do not scare the animals away. The forest nature landscape photography shows how birds, bears, and lions live when no one is watching. It is hard work, but very exciting to do.
Macro nature photography
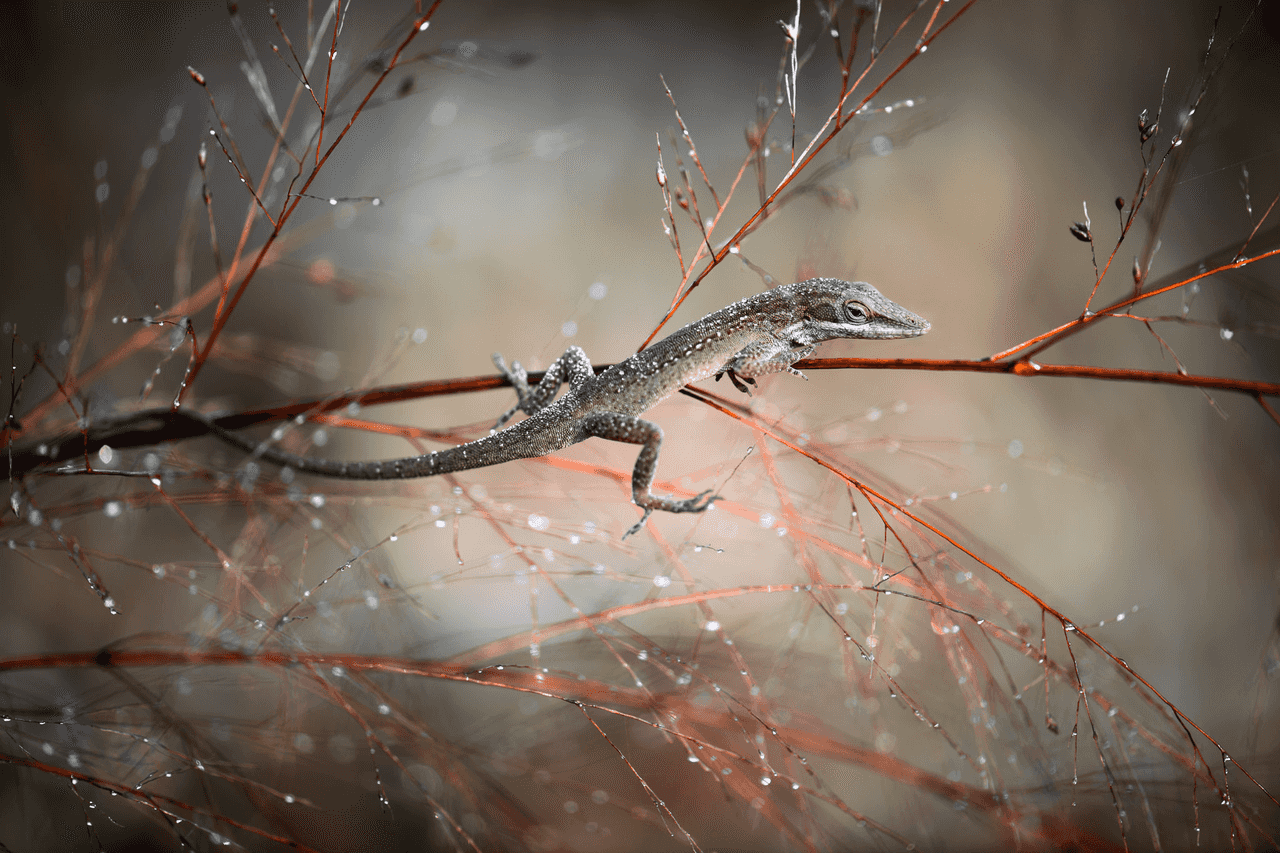
The word macro means taking pictures of very small things. This shows details we cannot usually see. You might take a photo of a spider's eyes or the lines on a leaf. It makes tiny parts of nature look huge and very cool. You will see things you never noticed before.
Nature night photography and astrophotography
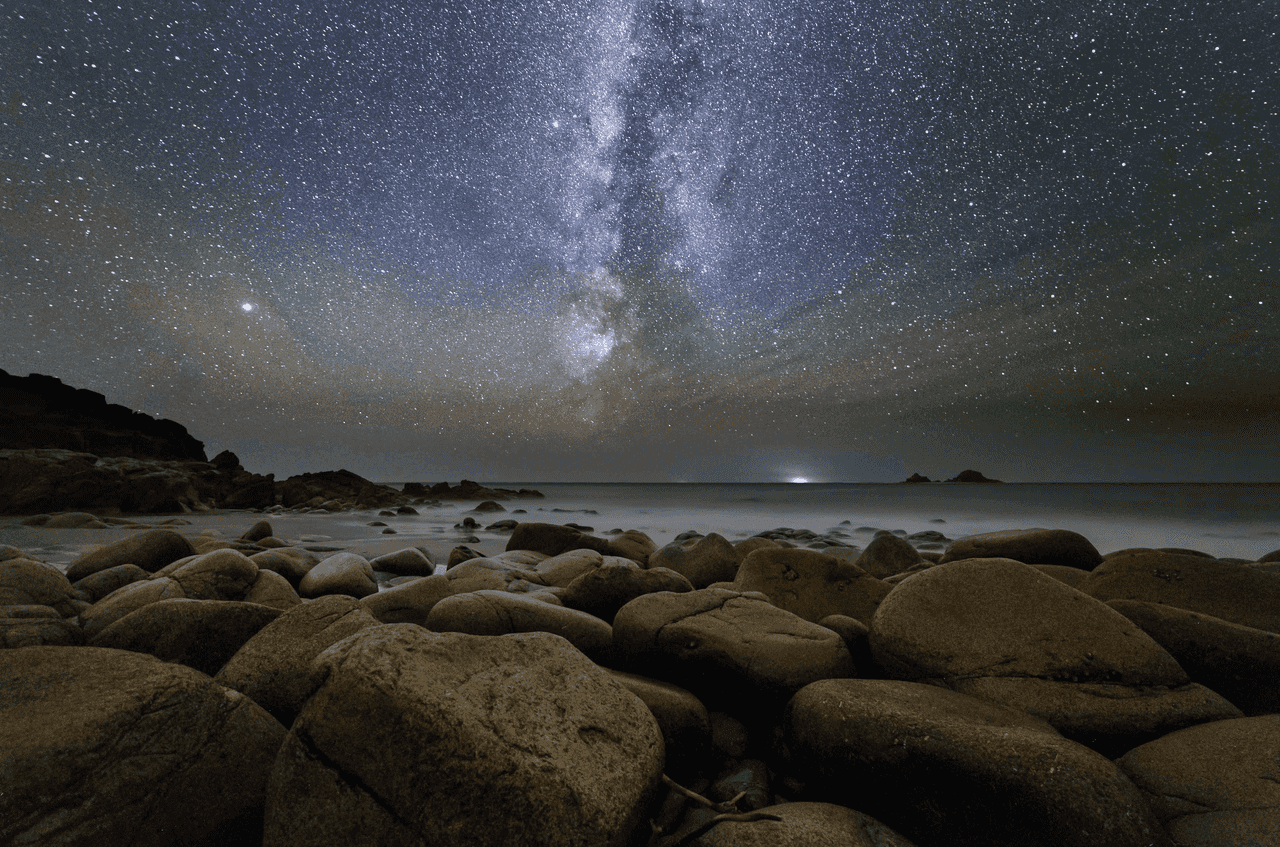
This type ideally works in the dark. People take pictures of the moon, stars, and the Milky Way. You need a tripod to keep the camera still. It is amazing to see how much the sky glows when the sun goes down. The night sky is full of magic and light.
Seasonal nature photography
As you already know, nature changes all the time. This style shows the four seasons. You can shoot white snow in winter or bright flowers in spring. It captures how the colors of the earth change from orange in the fall to deep green in the summer. Every season has its own special look.
Planning Your Nature Photography Shoot
A good plan makes your photos look much better and captures amazing shots. You should learn about the place before you go. Then think about what animals live there and what they do. This sunset nature landscape photography helps you be ready for the perfect moment. Here is a quick overview of the planning.
Research locations and wildlife behavior
First of all, check maps and local news to find the best spots. Then read about the animals you want to see. You should know when they eat or sleep. This makes it easier to find them without scaring them away. Good research saves you a lot of time and effort.
Check weather and lighting conditions
Make sure to look at the weather report before you leave home. In this case, clouds can make the light soft and pretty. Bright sun can make shadows look too dark. The best light is usually early in the morning. Checking the sky helps you pick the right day for your trip.
Visit locations at different times of day
A forest looks different at noon than it does at sunset. You can visit your favorite spots many times to see the change. You might find new shadows or colors as the sun moves. This helps you choose the exact time for the best photo.
Pack appropriate outdoor gear
It is best to wear comfortable shoes and bring a warm jacket in layers. You will need a good bag for your camera and extra batteries. Do not forget to bring water and a few snacks. The right gear keeps you happy while you wait for a shot.
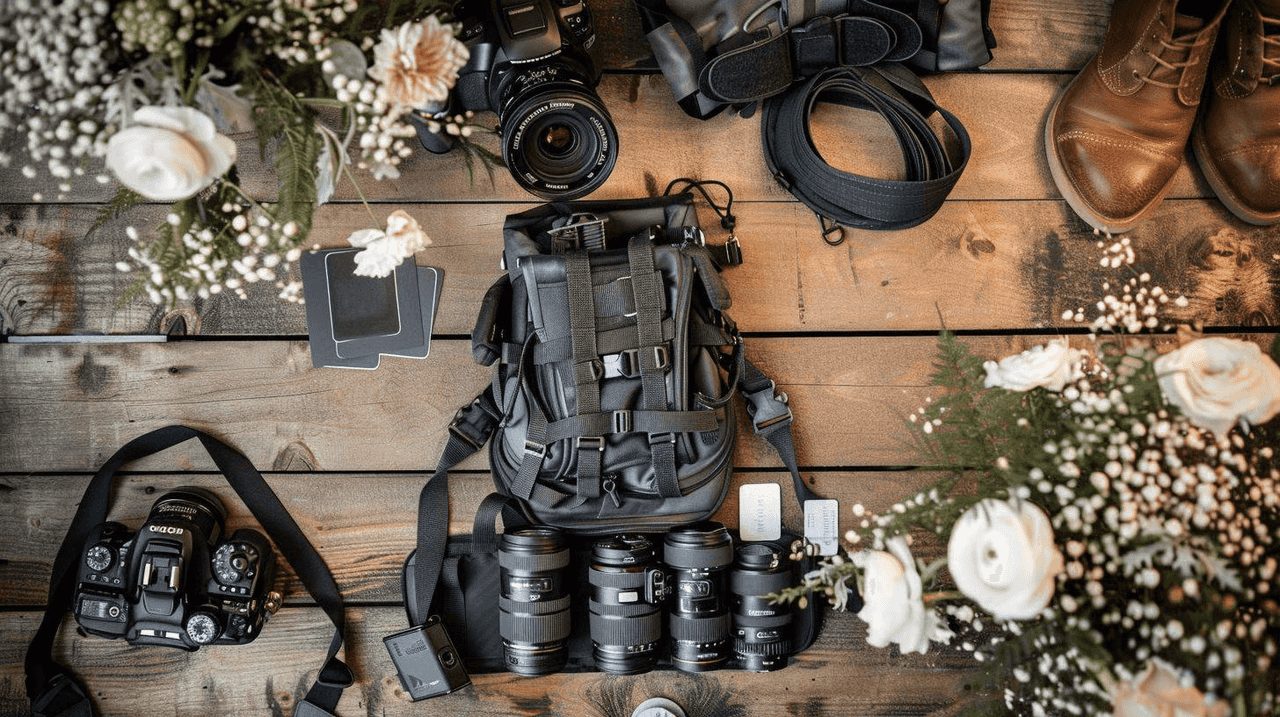
Essential gear for nature photography
If you have the right tools, this makes a big difference in capturing any scene. You do not need to spend a lot of money to start. A simple gear can still take beautiful photos if you know how to use it. Here are detailed insights into the tools of nature photography landscape.
Cameras for outdoor photography
A good camera helps you capture clear pictures of plants and animals. Many beginners like mirrorless cameras because they are light and easy to carry. Brands like Canon and Sony make great models for new photographers. You want a camera that can take pictures fast. Thus, you do not miss a moving bird.
Item | Purpose | Key selection tips |
|---|---|---|
Mirrorless camera | Captures high-quality natural photos while remaining lightweight for travel | Choose fast autofocus and good battery life |
DSLR camera | Reliable option for wildlife and landscape photography | Look for strong low-light performance |
Weather-sealed camera body | Protects the camera from rain, dust, and cold | Select models with outdoor durability |
Camera with fast burst mode | Helps capture fast-moving birds or animals | Aim for higher frames-per-second shooting |
Best lenses for nature photography
As you already know, the lenses are like the eyes of your camera. A wide lens is great for big mountains and trees. If you want to see animals from far away, you need a long zoom lens. For tiny bugs and flowers, a macro lens works best. Each lens helps you tell a different story about the world.
Item | Purpose | Key selection tips |
|---|---|---|
Wide-angle lens | Captures landscapes, mountains, and forests | Choose lenses between 10 and 24mm for wide views |
Telephoto lens | Photograph wildlife from a safe distance | Look for a 200mm–600mm zoom range |
Macro lens | Captures small subjects like insects and flowers | Select lenses with 1:1 magnification |
All-purpose zoom lens | Flexible option for mixed photography scenes | Choose lightweight travel-friendly lenses |
Tripods and stabilization tools
A tripod is a stand with three legs that keeps your camera very still. This is important when there is not much light, like at sunrise. It stops your photos from looking blurry or shaky. Some people use bean bags to rest their cameras on rocks or logs.
Item | Purpose | Key selection tips |
|---|---|---|
Travel tripod | Keeps the camera stable for sharp images | Choose lightweight carbon fiber models |
Heavy-duty tripod | Provides strong support for large lenses | Look for high load capacity |
Bean bag support | Stabilizes cameras on rocks, logs, or vehicles | Choose durable outdoor fabric |
Tripod ball head | Allows flexible camera angle adjustment | Select smooth movement with strong locking |
Filters for landscape photography
Filters are like sunglasses for your camera lens. A polarizing filter can make the blue sky look darker and remove shine from water. Other filters help when the sun is very bright. Thus, your photo does not look too white. They are small glass pieces that screw onto the front of your lens.
Item | Purpose | Key selection tips |
|---|---|---|
Polarizing filter | Reduces glare and deepens sky colors | Choose multi-coated glass filters |
Neutral density (ND) filter | Controls bright light for long exposure shots | Select adjustable or fixed ND levels |
UV filter | Protects the camera lens from dust and scratches | Choose slim filters to avoid vignetting |
Graduated ND filter | Balances bright skies with darker landscapes | Look for soft-edge filters for natural blending |
Reliable power solutions
Long outdoor photography trips require reliable power to keep cameras, drones, and other devices running. EcoFlow portable power stations provide fast, stable, and quiet energy, ensuring your gear stays charged throughout the day. Here are two powerful portable power solutions for outdoor nature photography:
Product | Capacity | Best use scenario | Key advantages |
|---|---|---|---|
EcoFlow DELTA 3 Plus (1 kWh) | 1024Wh | Mobile outdoor photography, travel shoots, and short nature trips | Compact design, fast charging, multiple ports for cameras, drones, and laptops |
EcoFlow DELTA 3 Max Plus (2 kWh) | 2048Wh | Extended wildlife photography, group camping trips, and multi-device setups | Larger power capacity, high output for multiple devices, supports solar and off-grid charging |
EcoFlow DELTA 3 Plus (1 kWh) for mobile photography setups
The EcoFlow DELTA 3 Plus is a compact and powerful portable power station designed for photographers working in outdoor locations. With a 1024Wh battery capacity, it provides enough energy to recharge cameras, drone batteries, controllers, and laptops multiple times during long shooting sessions in nature.
One of its key advantages is its strong power output, delivering 1800W of continuous AC power with a 3600W surge capacity. This ensures stable power for essential photography gear, including drones and editing laptops. Photographers can review images, recharge equipment, and prepare for the next shoot without worrying about running out of power.
Another major benefit is its ultra-fast charging capability. The power station can reach around 80% charge in about 45 minutes using an AC outlet. It also supports solar and car charging, which makes it ideal for extended outdoor trips or remote photography locations where traditional power sources are unavailable.
The station includes multiple output ports such as AC outlets, USB-A, USB-C, and DC, allowing several devices to charge simultaneously. Through the EcoFlow Mobile App, users can monitor battery levels, track energy usage, and manage power settings remotely, helping photographers stay organized and powered during long outdoor shoots.
Its compact design, quiet operation, and reliable performance make it a practical power solution for nature photographers who travel frequently and need dependable energy for cameras, drones, and other essential gear.
EcoFlow DELTA 3 Max Plus (2 kWh) for extended outdoor shoots
The EcoFlow DELTA 3 Max Plus is designed for photographers who need reliable power during long outdoor trips. With a 2048Wh battery capacity, it can charge multiple cameras, drone batteries, laptops, and other devices several times, making it ideal for extended wildlife photography sessions and remote shooting locations.
This power station delivers 3000W of continuous AC output with up to 6000W surge power, allowing it to handle high-power gear and multiple devices at once. Photographers working with drones, editing laptops, or using additional lighting equipment can run everything smoothly without worrying about power limits.
It also supports flexible charging options, including wall outlets, car outlets, generators, and solar panels, which is helpful for long off-grid photography trips. The expandable battery capacity and strong solar input allow photographers to maintain power even during multi-day expeditions in remote areas.
With multiple output ports such as AC, USB-A, USB-C, and DC, several devices can charge simultaneously. Through the EcoFlow Mobile App, users can monitor battery levels, track energy usage, and adjust power settings for efficient energy management in the field.
Its high capacity, strong output, and dependable performance make it an excellent solution for extended outdoor photography trips, group camping shoots, and professional drone or wildlife photography setups.
Accessories for outdoor photography
Small things can be very helpful on a long day outside. Bring extra batteries because cameras use a lot of power. You should also have extra memory cards to save all your photos. A cleaning cloth is good for wiping away dust or rain from your lens. A sturdy backpack for photography and landscape keeps all your gear safe and dry while you walk.
Item | Purpose | Key selection tips |
|---|---|---|
Extra camera batteries | Ensures longer shooting time outdoors | Carry fully charged backup batteries |
Memory cards | Stores photos and videos during long trips | Choose high-speed and high-capacity cards |
Lens cleaning cloth | Removes dust, water, or fingerprints | Use a microfiber cloth for safe cleaning |
Photography backpack | Protects and organizes camera gear | Choose waterproof and padded backpacks |
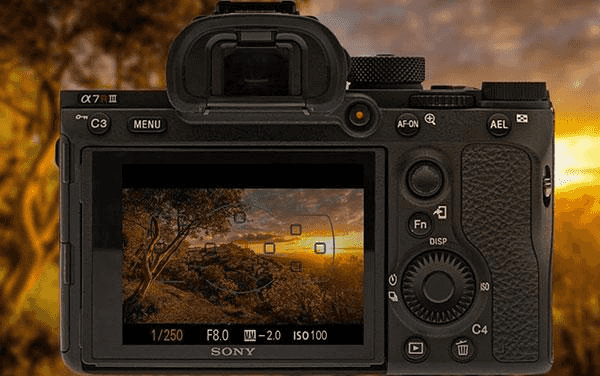
Best camera settings for nature photography
The right settings help your camera see the world clearly. You must change your buttons based on what you see. This helps you get the best colors and sharpest views outside. Learning these steps will make your beautiful, natural landscape photography look professional and very clean.
Aperture for landscapes and depth of field
Aperture controls how much of your picture is in focus. For big views, you can use a high number like f/11. This keeps everything from the front flowers to the far mountains looking very sharp. It is the best way to show how big and wide the Earth is.
Shutter speed for wildlife and motion
As you already know, the fast shutter speeds stop movement. If a bird is flying, use a speed like 1/1000. This makes the wings look still instead of blurry. It captures a crisp moment in time that our eyes might miss. This is very important when animals are running or jumping fast.
ISO for changing outdoor light
ISO helps your camera see when it gets dark. Make sure to keep it low, like 100, when the sun is bright. If clouds come or it is evening, turn it up to make the photo look brighter. Always be careful not to go too high, or the photo might look grainy.
Focus modes for moving wildlife
You can use a continuous focus for animals that move. It helps the camera follow a running deer or a flying eagle. This setting makes sure your subject stays clear even while it is moving across your view. It is the best way to get a sharp shot of a wild animal.
Setting | Recommended Values | Use Case/Notes |
|---|---|---|
Aperture (f-stop) | f/8 – f/16 | Landscapes and depth of field. High f-numbers keep foreground and background sharp, ideal for showing wide scenes. |
Shutter Speed | 1/500 – 1/2000s | Wildlife and fast motion. Fast speeds freeze movement, e.g., flying birds or running animals. |
ISO | 100 – 800 | Adjust to the lighting. Keep low in bright sunlight, increase in cloudy or evening conditions. Avoid being too high to prevent grain/noise. |
Focus Mode | Continuous / AF-C | Moving wildlife. Helps the camera track animals in motion, ensuring sharp focus on the subject. |
Lighting tips for stunning nature photos
As you already know, the light is the most important part in natural photography. It can make a simple tree look like a piece of art. You should watch how the sun moves across the sky all day. Here is the detail about the lighting tips.
Golden hour photography
The golden hour happens right after the sun rises or just before it sets. The light is very soft and looks like glowing gold. It makes everything look warm and pretty. This is the favorite time for most photographers because there are no harsh shadows on the ground.
Blue hour photography
The blue hour is the short time before sunrise or after sunset when the sky is deep blue. The world looks very calm and cool during this time. It is a great time to take pictures of the moon or city lights near the water. This makes everything look peaceful.
Shooting in cloudy or rainy conditions
It is best to avoid staying inside just because it is raining or cloudy. Clouds act like a big, soft blanket for the sun. This makes colors like green and red look very bright and deep. Furthermore, the rain can also add pretty water drops to leaves and flowers for a unique look.
Common mistakes to avoid in nature photography
Even the best photographers make mistakes sometimes. So, learning what to avoid will help you take better pictures much faster. If you stay careful and patient, your photos will look much more natural and professional. Here are common mistakes you need to avoid for HD nature photography.
Ignoring lighting conditions
Many people try to take photos when the sun is too high and bright. This makes very dark shadows and white spots that look bad. You should always look at where the light is coming from. If the light is too harsh, wait for a cloud or find some shade.
Using incorrect camera settings
If your settings are wrong, your photos might be too dark or very blurry. It is a mistake to leave your camera on "Auto" all the time. You need to check your shutter speed and aperture for every new shot. You can take a second to check if your screen saves your work.
Disturbing wildlife
Getting too close to animals can scare them or make them move away. Some people make noise to get an animal to look at them, but this is bad for nature. It is better to use a long lens and stay quiet. So, respecting animals is the most important rule.
Forgetting to stabilize the camera
Holding a camera with just your hands can cause shaky pictures, especially when it is getting dark. A big mistake is leaving your tripod in the car because it is heavy. Even a small shake can ruin a great shot. It is best to find a way to keep your camera perfectly still.
Over-editing nature photos
It is fun to change colors on a computer, but doing too much makes photos look fake. Some people make the grass too green or the sky too blue. The nature photography HD goal is to show the real beauty of the Earth. Keep your edits simple, so the photo still looks like real life.
Ethical rules for nature photography
Being a good photographer means being a good friend to nature. We must protect the places and animals we love, so they stay safe. Your goal should be to leave no trace behind when you go home. Here are details about the ethical rules:
Respect wildlife and habitats
Always remember that you are a guest in the animals' home. Do not leave any trash behind or walk on fragile grass. When we stay on the paths, we help keep the forest healthy and clean. A good photo is never worth hurting a plant.
Keep a safe distance from animals
You should always stay far away from wild animals so they do not feel scared. If an animal stops what it is doing to look at you, you are too close. You can use a long zoom lens to get a tight shot from a distance. This keeps both you and the animal very safe.
Avoid disturbing nests or plants
Make sure to never move branches or leaves to get a better view of a bird's nest. If you move things, you might show predators where the babies are hiding. It is also important not to pick wildflowers or step on rare moss.
Follow park regulations
Every park has special rules to keep the land beautiful for everyone. Read the signs and follow the directions from the park rangers. These rules are there to protect the trees and the water from being ruined. Following the law shows that you truly care about the future of our great outdoors.
Conclusion
To sum up, nature photography is a wonderful way to enjoy the great outdoors. It takes patience and a lot of practice to get the best shots. Whether you are looking at big mountains or tiny insects, you are learning to see the world in a new way. Always remember to stay safe and respect the environment while you explore and take nature photography hd.
When you go on long trips, staying powered up is the key to success. EcoFlow provides stations that allow you to keep your cameras and drones ready to go. These tools are perfect for carrying into the woods. They give you the freedom to stay in nature much longer without worrying about a dead battery.
FAQs
What is the 20-60-20 rule in photography?
The 20-60-20 rule helps photographers manage their time. You spend 20% of your time planning the trip. Then, 60% of your time is spent taking photos outside. Finally, the last 20% is used for editing your pictures at home.
What is the golden rule of photography?
The golden rule is the "Rule of Thirds." You divide your photo into nine equal parts using two lines across and two lines down. Placing your subject where these lines meet makes the picture look more balanced and interesting to see.
What are the three basic photography techniques?
The three basic techniques are lighting, composition, and focus. Lighting helps you set the mood using the sun. Composition uses the Rule of Thirds to place subjects in the right spot. Focus ensures your subject is sharp and clear, making the picture look professional.