How Do You Wire an Electric Cooker? Safe Setup, Cable Guide & Diagrams
- Electric cooker wiring basics you must understand
- What wire do you need for an electric cooker?
- Electric cooker wiring diagram explained
- Step-by-step: How to wire an electric cooker to the mains
- Common wiring mistakes to avoid
- Can you wire an electric cooker yourself?
- Real-life power scenarios for electric cooking (and smarter solutions)
- Scenario 4 – Safer energy management in DIY electrical setups
- Troubleshooting common cooker wiring issues
- Conclusion
- FAQs
Electric cookers are not something any homeowner would use daily, but when it comes to installing a new kitchen or replacing an old fireplace appliance, it is a job that will come around sooner or later. Get it right, and your cooker will last longer at a safe rate. Get it wrong, and you have broken breakers, broken appliances, and so on.
This guide is a step-by-step process that teaches you how to connect an electric cooker to the mains, the basic wiring, the type of cable to use, and how to read a wiring diagram. We also have some real-life examples of how to manage energy use in your own kitchen, including how home solar battery systems can help relieve pressure on your home's electrical circuit and cut your monthly utility bill.
Electric cooker wiring basics you must understand
It is better to know what is unique in the electric cooker wiring as opposed to the normal household wiring.
The fuses are 13A or 16A and have relatively modest loads on most household sockets and circuits. Another type of appliance is an electric cooker, which is a completely distinct type of appliance. A full-size electric range hob, oven, and grill running together can draw 30-45 amps of current. This is what makes cookers require their own dedicated circuit, their own cable, and their own control unit. They are not able to share the circuit with other appliances.
Installation of electric cookers in the UK must be in line with BS 7671 (the IET Wiring Regulations, or the 18th Edition). The standard is applied to such things as cable size and circuit protection, as well as the manner in which the connections are made and tested. Any non-compliant work, unless explicitly stated in the home insurance policy, will not only be potentially dangerous, but also, once the property is sold, it will also be invalid based on non-compliant work.
Note: Electrical installation standards and regulations are subject to change. Always refer to the latest edition of BS 7671, current Building Regulations, and guidance from NICEIC, NAPIT, or your local authority before carrying out any electrical work. When in doubt, consult a qualified electrician.
Power requirements of electric cookers
Electric cookers are rated by their total wattage - the maximum power that they can draw when all elements are running at full load and the oven. The common power ratings are about 6kW in a small freestanding range cooker and about 1214kW in a large freestanding range cooker.
To determine the current draw, the wattage is divided by the mains voltage (230 V in the UK):
A 7.2kW cooker draws approximately 31A (7,200 ÷ 230)
A 10kW cooker draws approximately 43A (10,000 ÷ 230)
This present rating will directly dictate the cable size, fuse rating, and circuit breaker you will be required to have. Don’t take this calculation lightly; undersized cabling to the load it will carry will, in due course, overheat, leading to a serious fire hazard.
What wire do you need for an electric cooker?
The cable you are using between your cooker and the mains should be rated along with its ability to carry the full current that your appliance is capable of, and a safety margin should be incorporated. One of the most frequent and hazardous errors in installing a cooker is the use of an underrated cable.
How to choose the correct cable size
Twin and earth (T&E) cable is standard in the UK to connect a cooker. The sizing is based on the following broad guidelines:
Cooker Load | Recommended Cable Size | Typical Circuit Breaker |
Up to 30A (approx. 7kW) | 6mm² twin and earth | 32A |
30A–40A (approx. 7–9kW) | 6mm² twin and earth | 32–40A |
40A–45A (approx. 9–10kW) | 10mm² twin and earth | 40–45A |
Large range cookers (10kW+) | 10mm² twin and earth | 45A |
Beware of looking at the installation manual of the cooker to seek out the particular cable specifications of the manufacturer of the cooker. To fit certain specific range cookers or with unusual characteristics, manufacturers occasionally give specifications of cable sizes that are different from the general specification above.
A few additional points worth knowing:
Cable length matters. Cable runs of longer lengths have higher voltage drops, which may impair performance and safety. You might need to increase the cable size to over 10 metres. An electrician will be able to estimate the specifications that you require for your installation.
Install a cable with a heat-resistant cable around the cooker. The part of the cable nearest to the appliance is subjected to greater heat. Heat-resistant sheathing- This would help in reducing degradation as time goes by.
The earth conductor is not negotiable. Any circuits of cookers should have an earth conductor which is of a suitable size. This is your first line of defence against electric shock should there be a fault.
Electric cooker wiring diagram explained
By having a wiring diagram visible prior to beginning any installation, you get a visual picture of the flow of the circuit and where each conductor is connected. This is the way the typical UK cooker circuit is wired out.
Basic wiring diagram (simple explanation)
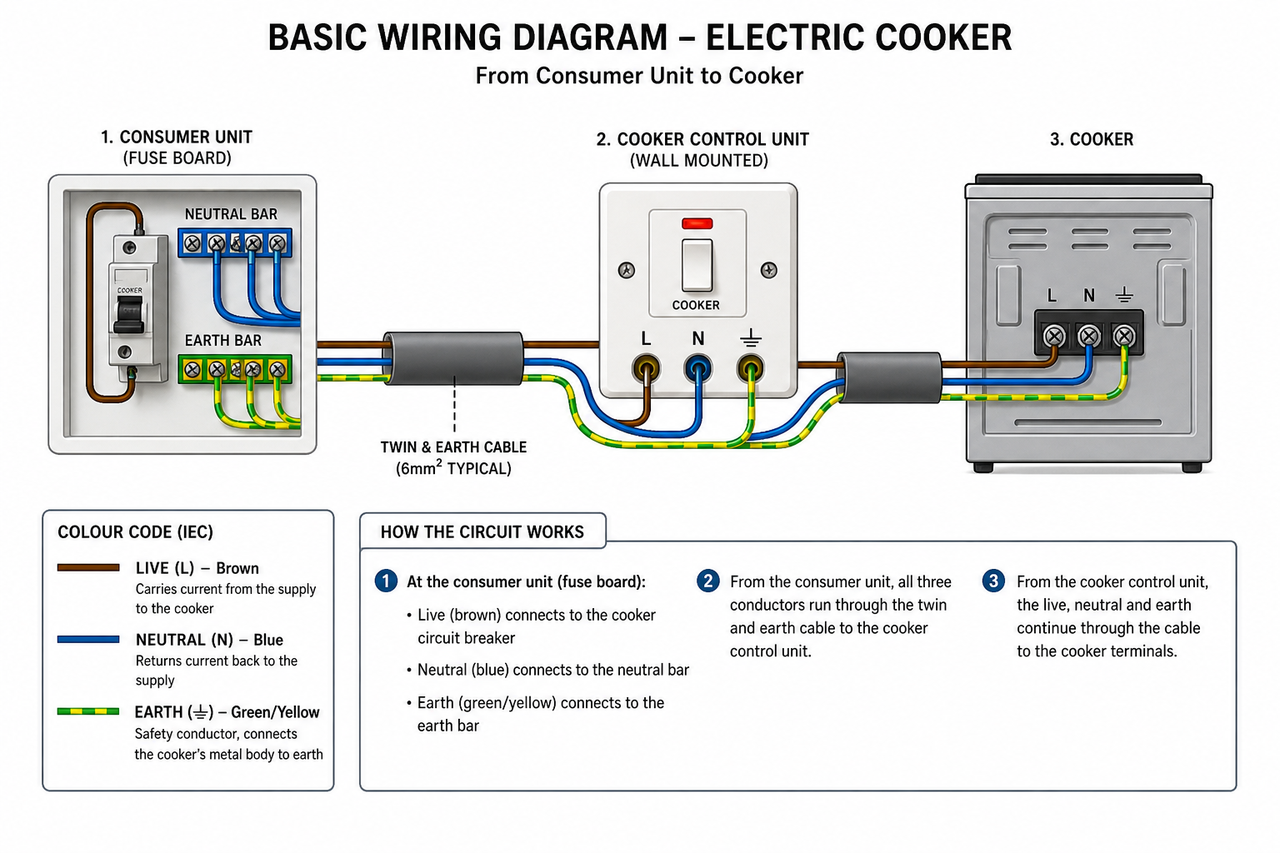
An average circuit of an electric cooker consists of a run of a twin and earth cable, connecting the consumer unit (fuse board) to the cooker control unit mounted on the kitchen wall and thence to the cooker itself.
The circuit is equipped with three conductors:
Live (brown) -This is the supply current that is passed to the cooker.
Neutral (blue) - puts the current back to the supply.
Earth (green/yellow) - used as a safety conductor, by connecting the metal body of the cooker to earth.
At the consumer end, the live end is connected to the circuit breaker, and the neutral end is connected to the neutral bar. The earth is attached to the earth bar. There, all three of them are brought through the cable to the control unit, and then to the cooker terminals.
UK wiring diagram for electric cookers
The wiring of an electric cooker in the UK is designed to follow BS 7671 and is normally in the format illustrated below:
Consumer Unit → Dedicated MCB (32A, 40A, or 45A, depending on the load) → Twin and Earth Cable (6mm2 or 10mm2) → Cooker Control Unit → Cooker Terminal Block
The cooker control unit has two purposes: it operates as the isolation switch (so you can safely disconnect the cooker when not in use without going to the fuse board), and it may include a 13A switched socket for small appliances. The cooker circuit is shared with this socket, and hence the circuit breaker is sized to accommodate both the cooker load and the socket load at the same time.
In the case of a socket: how to wire an electric cooker wiring diagram setup the socket in the control unit includes a socket outlet. The total load calculation should include the socket outlet in addition to the cooker. Practically, most installers use a 45A circuit when installing a socket on any cooker, without considering the individual rating of the cooker.

Socket vs hardwired connections
The UK has electric cookers which are connected in one of two ways:
Hardwired (direct connection): The cable is directly connected to a terminal block on the cooker. The most prevalent installation of freestanding and built-in cookers is this. The cooker does not have a plug; the cooker is wired permanently and can only be disconnected from the control or consumer unit.
Connection by cooker outlet plate: A hardwired connection is sometimes replaced by a dedicated cooker outlet plate; this connection may be hardwired or use shielded twisted pair (UTP). This gives the cooker a slightly easier way to disconnect to be serviced, but it still should have a dedicated circuit and is not the same as a standard 13A plug socket.
Important: Electric cookers should not be plugged into a conventional 13A household plug. The current flowing is way more than what a normal circuit in a socket is set up to support.
Step-by-step: How to wire an electric cooker to the mains
In this section, the working process is represented in order to be able to understand its functioning as a learning process. As mentioned above, the actual installation should be accomplished by a certified electrician.
Step 1 – Turn off the power supply
At the consumer unit, break off the specific circuit breaker of the dedicated cooker, and lock it or tape it so that it cannot be accidentally switched back on. This ensures the circuit is dead before touching the cables. Always check whether a circuit is off or not.
Step 2 – Prepare the cable
Cut the cable to length, leaving sufficient slack at each end. Peel off the outer sheath on each side, taking care not to nick the insulation on the separate conductors. Take away about 1015mm off the ends of both conductors and sleeves with green/yellow heat-shrink sleeving.
Step 3 – Connect to cooker terminals
Unscrew the terminal block cover on the cooker. Live (brown) to L, neutral (blue) to N and earth (green/yellow) to earth terminal. Ensure that every screw is tightened - any loose connection will cause resistance, heat, and eventual failure with time. Install a new terminal cover.
Step 4 – Connect to the control unit
In the cooker control unit, the incoming supply cable (to the consumer unit) is connected to the mains terminals, and the outgoing cable (to the cooker) to the load terminals. On each side, the terminals that are live, neutral, and earth are labelled. Fasten all conductors where they are exposed, and be sure that no bare copper is exposed outside of the terminals.
Step 5 – Test the setup
Before resuming power, physically examine all connections - screws on terminals fits tight, conductors should be properly labelled, and there should be no bare copper. An approved electrician will also perform insulation resistance and continuity testing before he/she signs off. After testing is done, turn on the power and test the operation of the cooker.
Common wiring mistakes to avoid
Employing a cable that is too small. The error that is the most dangerous. In case the cable is unable to cope with the current draw of the cooker, the cable overheats. Always size cable to the maximum current, not average draw.
Failing to offer a special circuit. Using a cooker circuit with another appliance overloads the circuit and poses a tripping or fire hazard. The cookers should always have their own special circuit out of the consumer unit.
Loose terminal connections. An improperly tightened terminal produces resistance and heat at the connection point, which will either melt insulation or produce arcing. All terminals should be securely tightened.
Incorrect cable identification. Brown is alive, blue is neutral, green/yellow is earth-always. It is possible to break equipment and present a shock hazard even when an appliance is visibly off.
Skipping the earth connection. The earth conductor will save you in case the cooker develops a fault. An unearthed cooker has the potential to become alive to the touch. Never omit it.
Not sleeving the earth conductor. Where bare earth conductors are exposed, these conductors should be covered with green/yellow insulation. This ensures that there is no inadvertent contact with live terminals and that it meets the BS 7671 requirements.
Can you wire an electric cooker yourself?
It is the first question that most homeowners will ask, and the truth of the matter is that it is tricky, both legally and safely.
Under Part P of the Building Regulations, in England and Wales, the installation of a new circuit (which a cooker installation normally demands) is notifiable work. This implies that it has to be done by a registered competent person (someone registered with a scheme such as NICEIC or NAPIT) or must be made known to your local building control authority before any work can commence.
A person who is not registered may legally perform the work provided he first notifies building control and has it inspected and certified upon completion, but that will increase cost and delay. Pragmatically, the most convenient yet secure path for most homeowners is to employ a registered electrician.
Pure skills-wise, it is not that hard to wire in a cooker, but again, you really need to know some of the fundamentals of electricity. However, the potential of receiving weapons, and the disaster that results in fire, electric shock or insurance cancellation are serious enough that the professional pathway is highly recommended.
Real-life power scenarios for electric cooking (and smarter solutions)
One of the components of the picture is to understand the wiring of your cooker. The second aspect is dealing with the large volume of electricity it consumes. These are four typical situations that UK households can find themselves in - and how smarter energy management can work to their advantage.
Scenario 1 – Cooking during power outages
Power cuts do not happen frequently, but are not unprecedented in the UK, and they always seem to occur at the worst possible moment, such as partway through a Sunday roast, or halfway through the dinner of young children. A hardwired electric cooker obviously stops working when grid power goes down, leaving you with no way to cook.
This is altered with a home solar battery system. A battery system can keep on supplying power to your circuit at home when there is an outage, by storing solar energy throughout the day, so that when there is an outage, it can continue to supply power to your circuit in the home. It is not merely backup power; it is resilience that is built into your home.
Scenario 2 – High power demand in modern
Contemporary kitchens are power-greedy areas. All of them running at once places a heavy load on the electrical supply of your home. This, during peak evening times, also implies that they are drawing on the grid at its most expensive and congested.
A decent-sized solar battery with adequate output capacity can take much of this load, especially at times of day when the solar generation is at its peak. The EcoFlow STREAM Ultra X, and others, provide as much as 2,300W of continuous AC output, sufficient to power high-demand kitchen appliances and other household loads without pulling from the grid.
Scenario 3 – Reducing electricity costs while cooking
One of the most energy-consuming activities in a household is cooking. Using a large electric cooker to heat the kettle one or two hours a night will mount up over a month, especially at present UK electricity prices.
This is directly targeted at solar battery storage. By supplementing the grid supply with the quantity of electricity generated and stored during the day and employed during the night cooking period, the amount of grid power consumed by households at peak times can be significantly reduced. The EcoFlow STREAM Ultra X All-in-One Home Storage Kit is precisely this: a complete home solar and storage system that requires minimal supervision and simply exists in the background, shifting your energy consumption off the grid and to free solar energy.
Scenario 4 – Safer energy management in DIY electrical setups
To homeowners who are do-it-youselfers in their electrical system - maybe they themselves operate their own solar power system, or they monitor the power usage of their home, or they plan future upgrades - having a sense of how power is flowing through the home is, in fact, handy.
Recent home battery systems have smart monitoring apps that display real-time generation, storage, and consumption data. This assists households in knowing what appliances are consuming the most power, when the highest demand occurs, and how to schedule high-energy activities like cooking so that they occur when the solar generation is the highest. It is a more intelligent, more knowledgeable manner in which you operate electrical gadgets within your house.
Troubleshooting common cooker wiring issues
When the cooker is turned on, the circuit breaker immediately trips off. Typically, a short circuit in the cooker wiring or in the appliance. Unplug the cooker and test the circuit separately. When the breaker is held with the cooker disconnected, the fault lies in the appliance - were it still to trip, the fault would lie in the circuit wiring.
After the cooker is in use, it overheats a breaker after some usage. This may indicate that the circuit is overloaded or that the breaker is undersized for the actual draw of the cooker. Compare the rated current of the cooker with the breaker current. A small breaker will clear under sustained load, even when it will not clear under an initial short-circuit.
One ring or oven element is not working. Typically, a defective component as opposed to a wiring problem. Check with a multimeter on continuity- Infinite resistance indicates that the element has broken and requires replacement.
A bad smell in the control unit will be a sign of a loose connection or an overloaded connection. Switch off the consumer unit immediately and don't use the cooker until the control unit has been inspected. Any electrical equipment with a burning odour must never be overlooked.
The cooker display works, but no heat. Frequently, a faulted internal thermal cut-out. The majority of the cookers have a reset button - refer to the appliance manual. When it goes off again and again, perhaps there is some underlying problem with the wiring or ventilation that needs to be checked by a professional.
Conclusion
It boils down to three factors to wire an electric cooker safely: comprehending the amount of power that the appliance will consume, the correct type of cable and circuit protection, and the regulatory measures that will govern the installation.
Get them right - with an experienced electrician - and your cooker will operate safely for many years. Get something wrong, and you are creating a risk that is not going to manifest itself right away but will just cause issues in the long term.
Some other things to consider are the energy that the cooker is using. One of the most sensible methods to ensure that UK households lower the amount of money they pay to electricity bills at the end of each month is by reducing the energy load on the household electricity bill, by shifting the load towards stored solar power, instead of using expensive peak-time grid power.
The beautiful thing about a home solar battery is that they are operating silently in the background, and your kitchen is running as it always did, slicing down the amount you pay every month.
FAQs
How do you wire an electric cooker safely?
Safe wiring involves a dedicated circuit, the appropriate size of cable (6mm2 or 10mm2 twin and earth), a properly installed cooker control unit, and connections made to the manufacturer's requirements. Any work should be in accordance with BS 7671 and must be done by a qualified electrician under Part P of the Building Regulations.
What wire size do I need for an electric cooker?
Most cookers up to 9kW require 6mm² twin and earth on a 3240A supply. Greater cookers more than 910kW usually require 10mm2 on a 45A circuit. Always refer to the installation manual of the manufacturer of your particular model.
Can I connect an electric cooker to a normal socket?
No. Electric cookers are a much larger user of current than a 13A socket can absorb. This is not only dangerous, but it will probably short-circuit, destroy the socket, or cause a fire. Cookers need a special circuit including a cooker control unit.
Do I need an electrician to install an electric cooker?
The installation of a new cooker circuit would be notifiable work under Part P of the Building Regulations in England and Wales. This should be done either by the registered competent person or notified of building control and checking at the end. The easiest and most secure way is to use a registered electrician.
What is the UK wiring standard for electric cookers?
Installations of electric cookers should be in accordance with BS 7671 - the IET Wiring Regulations (18th Edition) - covering the size of cables, circuit protection, earthing, and testing. Work should also be in compliance with Part P of Building Regulations in England and Wales.