Best Ebike Kit: Conversion & Battery Solutions for Riders
Electric bikes are changing how we commute and explore — but you don’t need a brand-new e-bike to enjoy the benefits. With an ebike kit, you can quickly convert your regular bike into a powerful electric ride. From compact electric ebike kits to advanced ebike conversion kits with battery, there’s an option for every cyclist in Australia. This guide covers everything you need to know — choosing the right kit, installation, and maximizing battery efficiency.
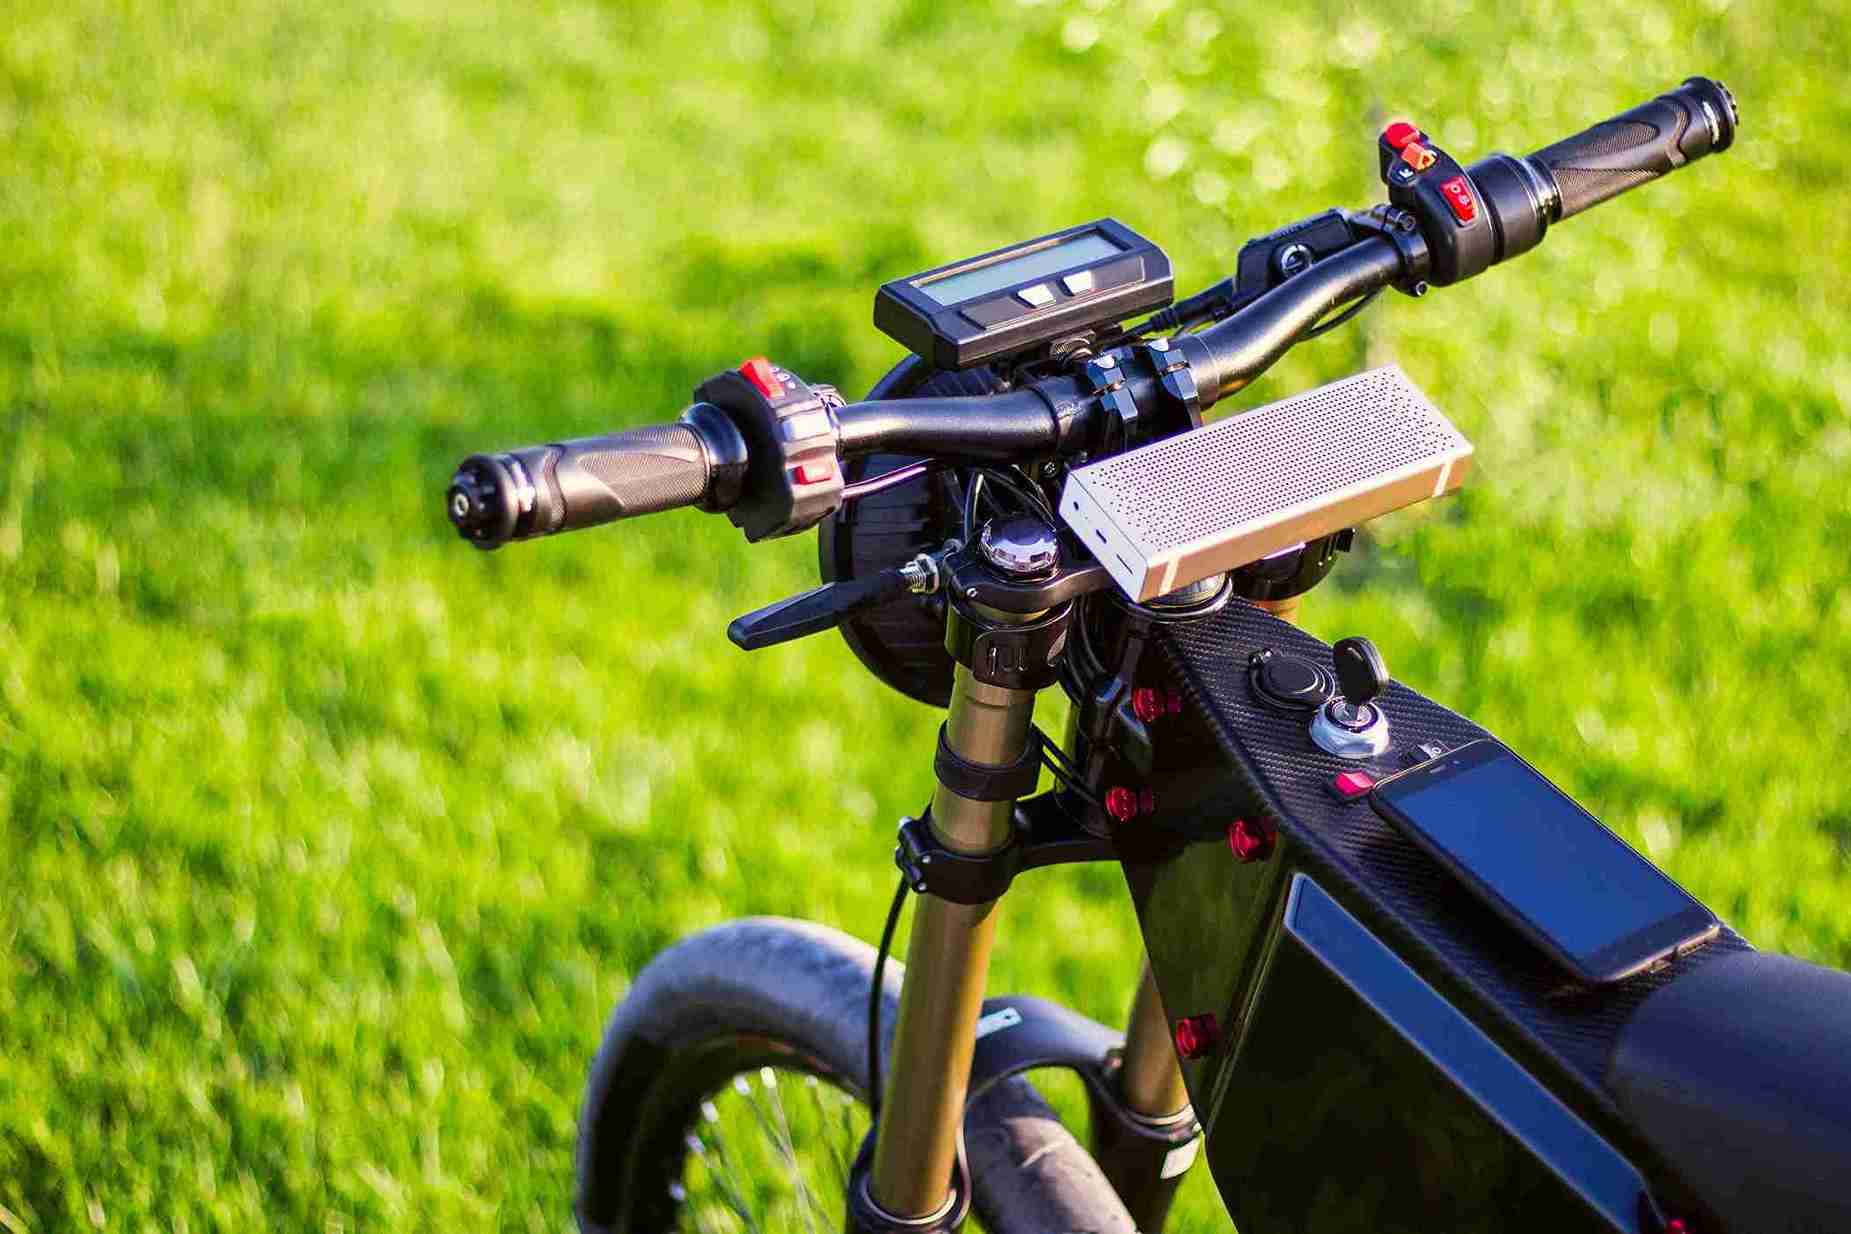
What Is an Ebike Kit?
An ebike kit—also known as an electric bike conversion kit—is a complete set of components that allows you to transform a regular bicycle into a fully functional electric bike. Instead of purchasing a new e-bike, riders can simply upgrade their existing bike with the necessary electric parts, saving both money and resources.
A standard electric ebike kit typically includes:
Motor: Installed in the front, rear, or middle of the bike to provide electric assistance when pedaling.
Battery: Powers the motor and determines your riding range.
Controller: Acts as the brain of the system, managing power flow between the motor and battery.
Display or Control Panel: Shows speed, battery level, and assist mode.
Pedal Assist Sensor (PAS): Detects when you’re pedaling and adjusts motor output automatically.
These kits are available in different power levels, commonly ranging from 250W to 1000W, depending on how much speed and torque you want. Lightweight commuter bikes often use smaller motors, while mountain or cargo bikes benefit from more powerful setups.
With the right ebike kit, you can convert nearly any bicycle—road, mountain, or hybrid—into an efficient electric ride. It’s an excellent choice for eco-conscious riders who want flexibility, customization, and the thrill of electric power without replacing their current bike.
Types of Ebike Conversion Kits
When choosing an ebike conversion kit, understanding the different motor placement options is key to finding the right balance of power, control, and ease of installation. The three main types are front hub, rear hub, and mid-drive kits — each offering unique riding experiences and benefits.
1. Front Hub Motor Kits
Front hub kits are the simplest to install since the motor replaces your bike’s front wheel. Power is delivered directly to the front wheel, creating an “all-wheel-drive” effect when pedaling.
Pros:
Easy installation and low maintenance
Balanced weight distribution between front and rear
Suitable for commuters and city rides
Cons:
Less traction on steep or slippery terrain
Slightly affects steering feel
Front hub kits are a great entry-level option for those new to electric bike conversion kits, especially if you want a quick setup for flat city routes.
2. Rear Hub Motor Kits
Rear hub motors are mounted on the back wheel, delivering a more natural “push” sensation similar to traditional cycling.
Pros:
Stronger traction and climbing ability
Feels like a normal bike when riding
Quieter operation than front motors
Cons:
Slightly more complex to install
Harder to remove the rear wheel for maintenance
Rear hub kits are among the most popular ebike conversion kits in Australia, ideal for riders seeking performance and reliability on varied terrain.
3. Mid-Drive Motor Kits
Mid-drive kits position the motor near the pedals, directly powering the crankset. This setup provides excellent balance and uses the bike’s gears for better torque efficiency.
Pros:
Superior climbing power and hill performance
Centralized weight for better handling
Works well with standard bike gearing
Cons:
More expensive than hub kits
Requires professional installation
Mid-drive kits are often the choice for serious riders or those converting mountain bikes for off-road adventures. Though pricier, they offer smoother performance and longer battery life.
Whether you prefer a simple front hub e bike kit or a powerful mid-drive electric bike conversion kit, the best option depends on your riding style, terrain, and budget.
Ebike Conversion Kit with Battery
The ebike conversion kit with battery is what transforms a standard bike into a truly independent electric ride. The battery is the heart of your system — it determines how far you can go, how much power your motor delivers, and how often you’ll need to recharge.
1. Battery Types and Capacity
Most conversion kits come with lithium-ion batteries, which are lightweight, long-lasting, and capable of delivering consistent performance. Battery capacity is measured in watt-hours (Wh) — the higher the number, the longer your range. For instance, a 500Wh battery can typically power your bike for 40–60 km, depending on terrain, riding style, and motor size.
If you’re planning longer commutes or off-road adventures, consider an electric bike conversion kit with battery that supports quick charging and efficient energy management. Choosing a reliable setup helps ensure consistent performance and maximizes battery life.
2. Charging and Portability
One of the most convenient aspects of e-bike kits is their ability to charge from various power sources — from home wall outlets to portable power stations while on the go. This flexibility allows riders to recharge their bikes even in remote locations without relying solely on fixed power sources.
For example, the EcoFlow RIVER 2 Pro Portable Power Station is a perfect companion for Ebike Kit users who ride long distances or explore off-grid trails. With 768Wh capacity and 800W AC output, it can quickly recharge most e-bike batteries, phones, or devices. Its compact 7.8 kg design and durable LFP battery make it easy to carry on weekend rides, ensuring your electric bike is always ready for the next adventure.
Whether you’re charging at home, in your car, or off-grid during a weekend ride, having a lightweight and fast-charging backup like the RIVER 2 Pro means your e-bike is always ready for the next journey.
In Australia, e-bike riders may also benefit from a battery rebate program, helping reduce the cost of high-quality batteries or portable charging systems.
3. Battery Maintenance Tips
To extend your e-bike battery’s lifespan:
Avoid fully draining or overcharging your battery.
Store it in a cool, dry place when not in use.
Recharge every few weeks if unused for long periods.
Consider pairing your charging setup with solar-compatible systems or portable power solutions for sustainable energy use.
If you’re using solar panels to charge your e-bike battery, choosing a charger with MPPT technology ensures faster and more efficient power conversion.
For riders who enjoy long outdoor trips, investing in one of the best solar chargers for backpacking can keep your e-bike and devices powered wherever your adventure takes you.
A high-quality battery ensures smooth performance and reliable power delivery — turning your regular commute into a comfortable, eco-friendly ride.
How to Install an Ebike Kit
Installing an ebike kit is easier than most riders expect. With the right tools and a bit of patience, you can transform your regular bike into a powerful electric ride in just a few hours. Whether you’re using a front hub, rear hub, or mid-drive conversion kit, the installation process generally follows these basic steps.
1. Prepare Your Bike and Tools
Start by inspecting your bike’s frame and wheels. Ensure your brakes, chain, and drivetrain are in good condition before beginning. You’ll typically need:
Allen wrenches and spanners
Screwdrivers
Cable ties
A bike stand (optional but helpful)
Before starting, check that your chosen e bike kit matches your bike’s wheel size, dropout spacing, and bottom bracket type to avoid installation issues.
2. Install the Motor
Depending on the type of kit you’ve chosen:
Front Hub Motor Kit – Replace your front wheel with the motorized one. Connect the motor cables following the manufacturer’s guide.
Rear Hub Motor Kit – Remove your rear wheel, attach the new motorized wheel, and re-thread the chain properly.
Mid-Drive Kit – Remove your existing crankset and bottom bracket, then install the motor unit in its place. This option provides better balance and torque for hilly terrains.
3. Mount the Battery
Attach the battery securely to the frame or rear rack using the provided brackets. Make sure it’s firmly positioned and not exposed to excessive vibration or direct water splashes. For long-distance riders, choosing an ebike conversion kit with battery that supports quick removal allows easy charging both indoors and outdoors.
4. Connect the Display and Sensors
Most electric bike conversion kits include a display screen, throttle, and pedal-assist sensors. Mount the display on your handlebars for easy access to speed, battery level, and riding mode. Connect the throttle and sensors following the color-coded connectors to ensure proper function.
5. Test Your Setup
Once everything is connected, turn on the system and test each function:
Check motor response when pedaling or using the throttle.
Ensure the brake cut-off sensors work correctly.
Confirm that the display reads the correct battery level and speed.
After testing, tidy up the wiring using cable ties to keep your setup clean and safe.
Once your conversion is complete, you’ll instantly feel the difference — smoother rides, effortless climbs, and extended range without needing a full e-bike replacement.
Conclusion
Converting your regular bike into an electric one is easier and more rewarding than ever with a quality ebike kit or electric bike conversion kit. Whether you choose a simple front hub setup or a powerful mid-drive system with a long-lasting battery, you can enjoy faster commutes, longer rides, and a greener way to travel. With the right tools, a reliable battery, and a bit of care, your upgraded e-bike will deliver comfort, performance, and freedom on every journey — proving that sustainable mobility with an ebike kit is both fun and practical.
FAQs
How Fast Would a 2000W Ebike Kit Go?
A 2000W ebike kit is a high-power setup that can provide impressive speed. Depending on the bike type, rider weight, terrain, and local regulations, such a kit can typically reach speeds of 45–60 km/h (28–37 mph). Keep in mind that most countries, including Australia, have legal limits on e-bike speeds — using a 2000W electric bike conversion kit may require following local rules to ride safely and legally.
Can I Convert a Regular Bike Into an E-Bike?
Yes! With a quality ebike kit or electric bike conversion kit, almost any regular bike — road, mountain, or hybrid — can be upgraded to electric. The kit usually includes a motor, battery, controller, and sensors. Installation is straightforward with the right tools, and it allows you to enjoy longer rides, easier hills, and an eco-friendly commute without buying a brand-new e-bike.
How Is an Ebike Kit Different From Buying a New Electric Bike?
An Ebike Kit allows you to convert your existing bike into an electric bike, saving money and giving you flexibility to choose components like motor, battery, and display. Unlike buying a new e-bike, it lets you upgrade your current bike while customizing performance and style.
Will Installing an Ebike Kit Affect My Bike’s Warranty?
Installing an Ebike Kit may void your bike manufacturer’s warranty depending on the brand and coverage. Some manufacturers consider modifications like adding a motor or battery as changes that could affect claims. It’s recommended to review your warranty and consider professional installation to avoid potential issues.
How Long Does It Take to Charge an Ebike Kit Battery?
Charging time depends on battery capacity and charger type. Most lithium-ion Ebike Kit batteries (500Wh–750Wh) take about 3–6 hours for a full charge. Using fast chargers or portable power stations can reduce charging time and help maintain battery performance.